| Use Cases | ||
|---|---|---|
| Previous | ||
| Workflow | ||
The following use cases will take you through an entire workflow - from task creation to promoting changes to the main repository.
This use case describes concept authoring with one author and one reviewer.
Roles:
| Workflow | Author | Reviewer | Task status |
|---|---|---|---|
| 1. Working on branch | Activate task | - | ASSIGNED |
| 2. Adding a description | Add a synonym. Save. | - | ASSIGNED |
| 3. Submitting changes for review | Set status to RESOLVE AS FIXED. Save. | - | RESOLVED |
| 4. Starting review process | - | Activate task | RESOLVED |
| 5. Reviewing work | - | Review work on review tab, Accept changes, Save | RESOLVED |
| 6. Verifying changes | - | Set task status to MARK AS VERIFIED, Save. | VERIFIED |
| 7. Promoting changes | - | Promote changes. Task is automatically closed | CLOSED |
To invoke the task wizard, click the button
![]() in the Task view. Alternatively you can use the main menu: File > New > Snow Owl > New Task
in the Task view. Alternatively you can use the main menu: File > New > Snow Owl > New Task
On the first page of the wizard you are prompted to select
Hit Next to continue.

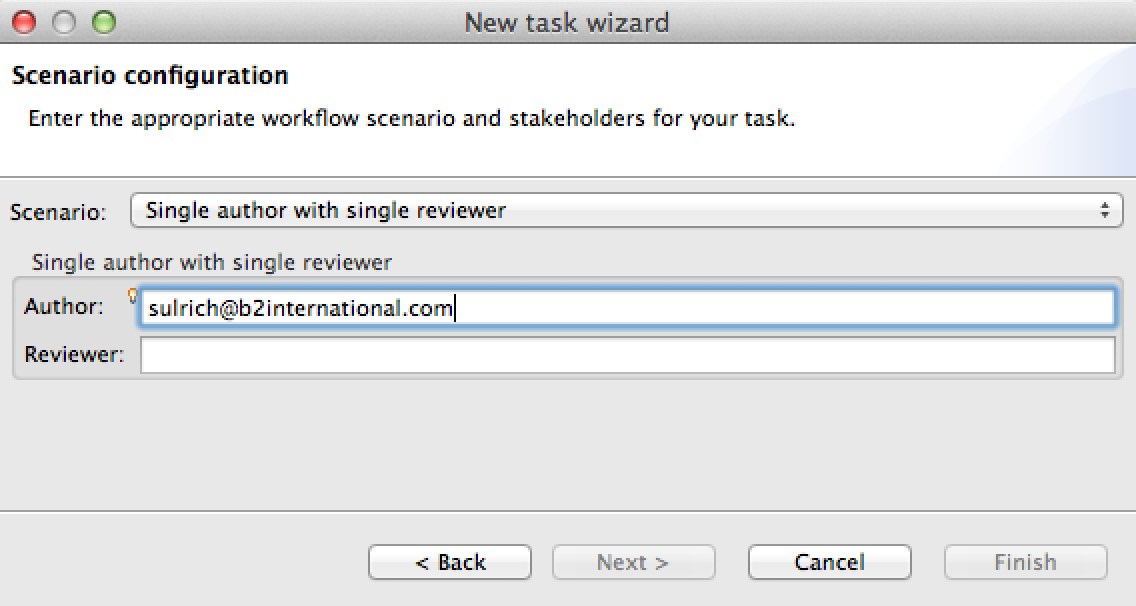
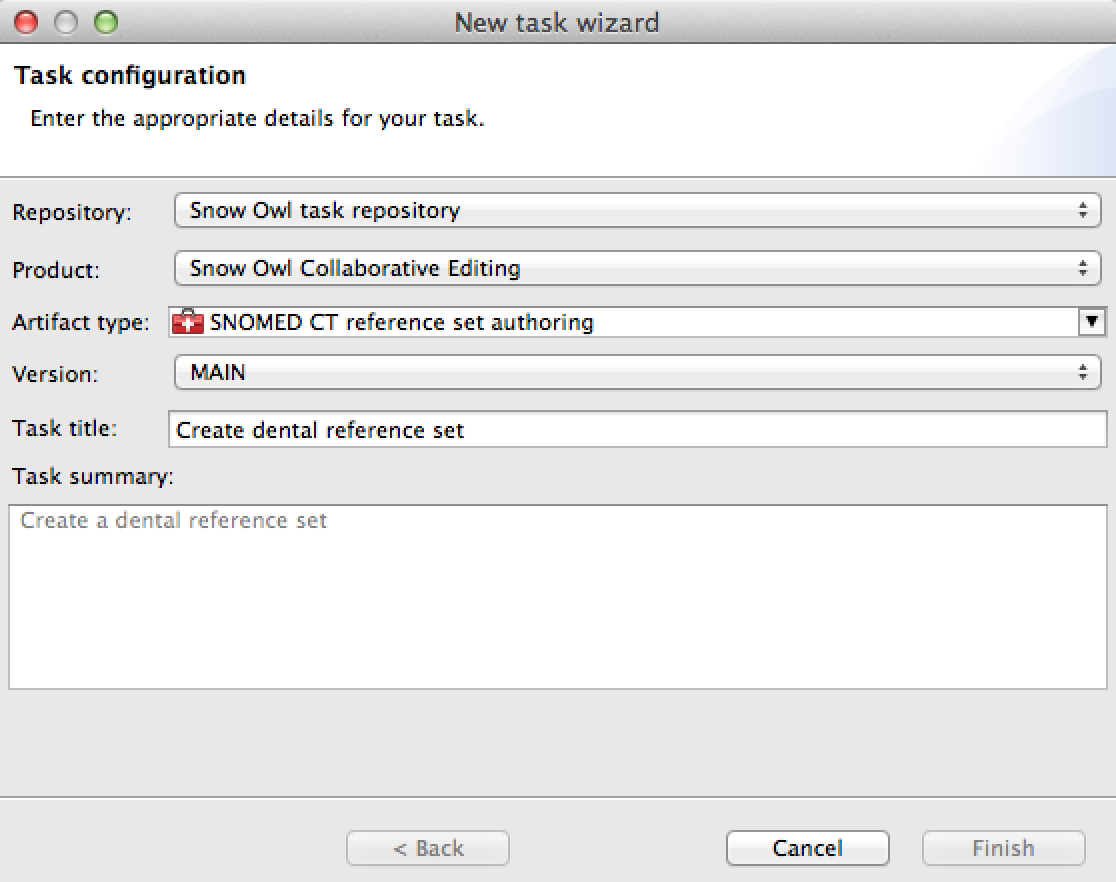
On the second page of the task editor you have to specify the following, mandatory information.
Hit'' Finish'' to complete the process.
Once you have decided to start working on a task, you need to activate that task. Only one task can be activated at a time. Activating the task means that you entered the collaborative mode, and the changes you are making are only visible to other users that have the same task activated.
To activate your task click on the purple circle in the toolbar. A frame will appear around the circle indicating that the task is active (see screenshot). You can also activate your task by clicking on the circle in the task view.

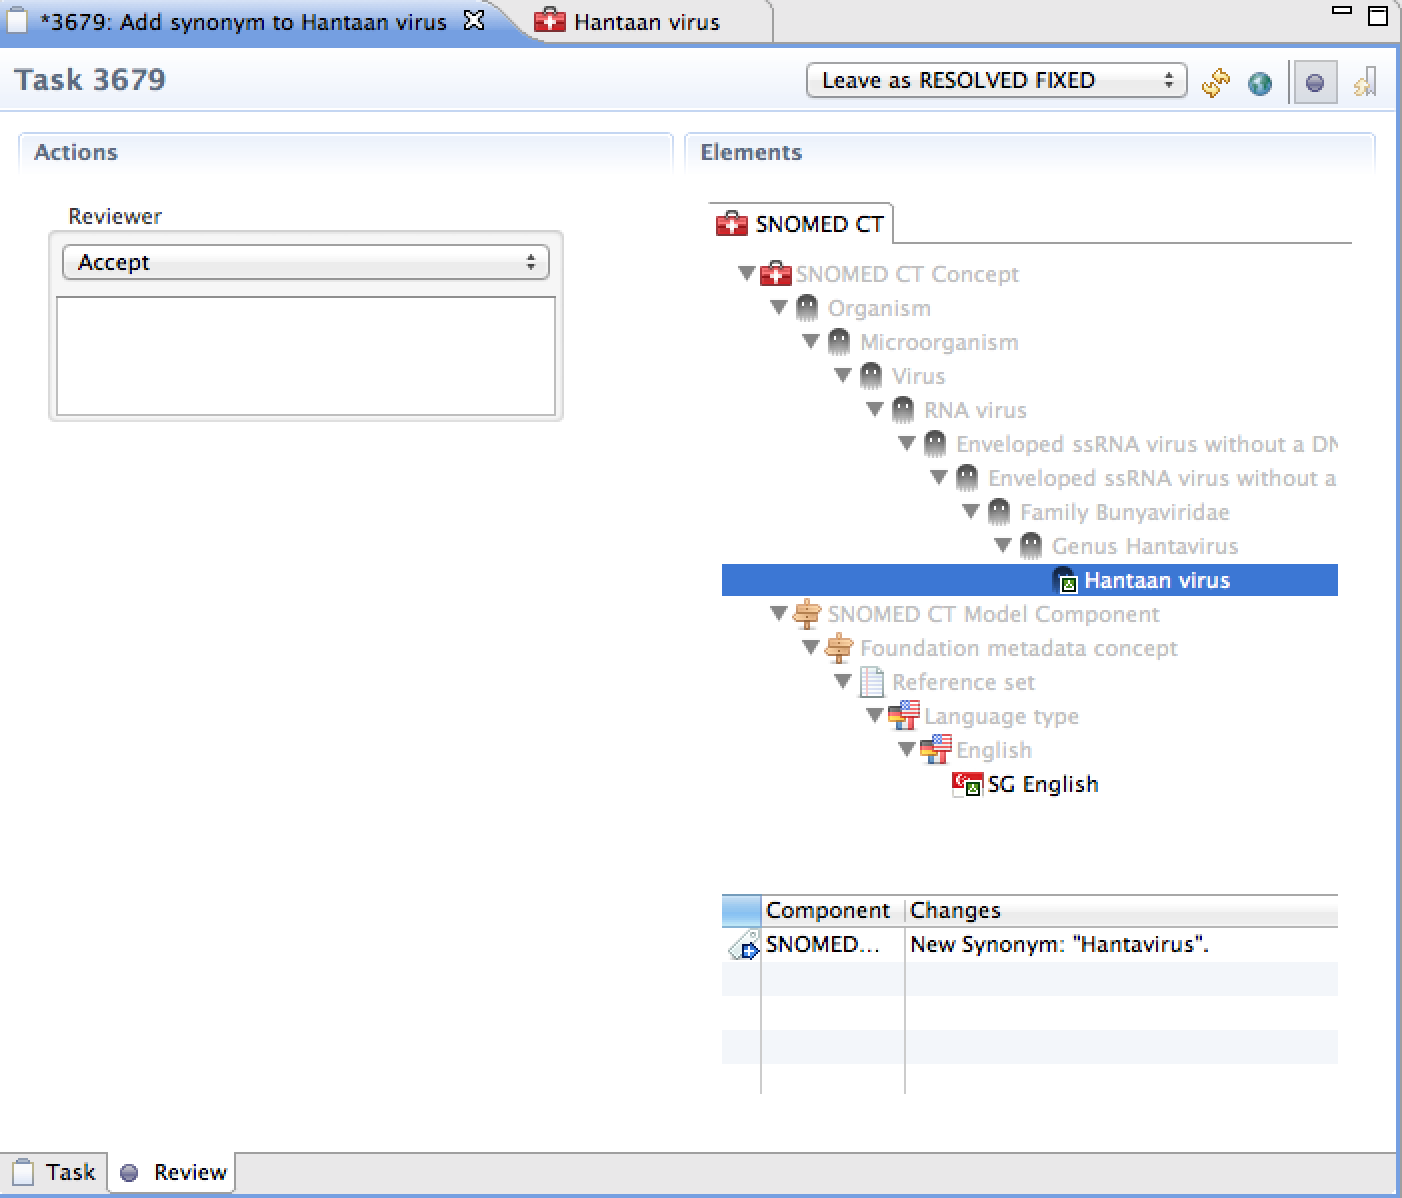
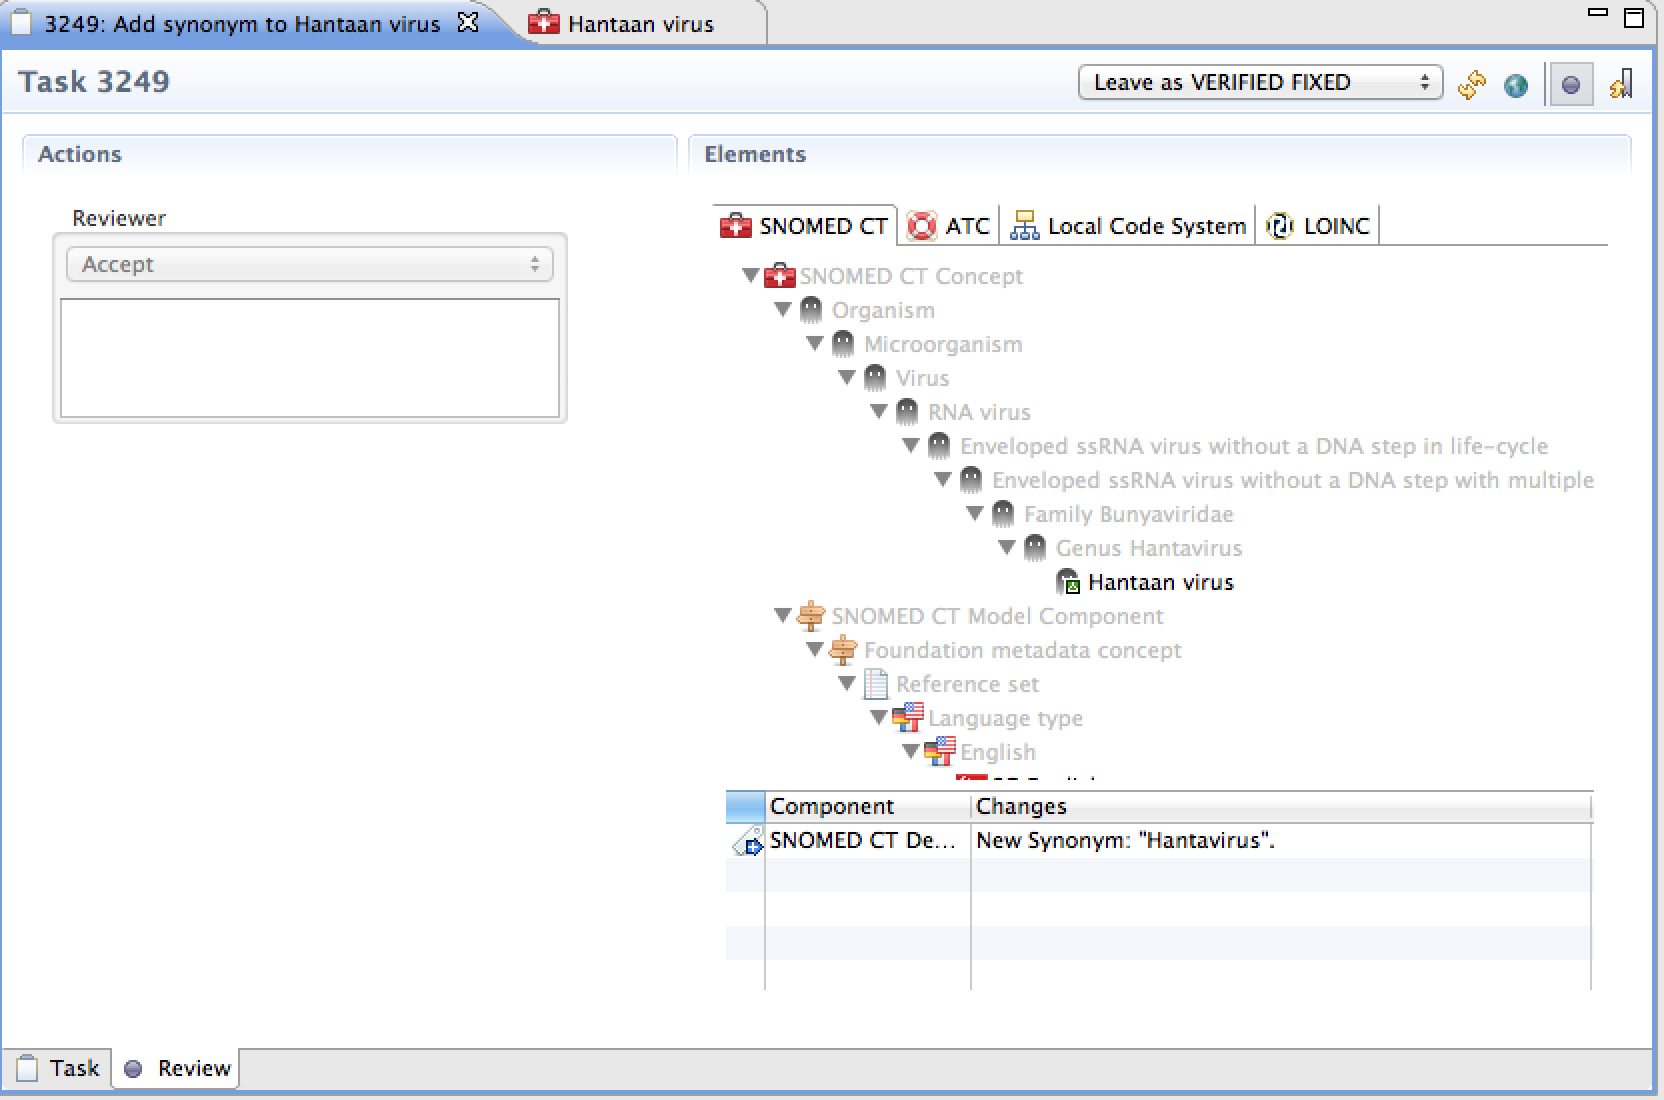
You are now working now on a branch, this means as long as the task is activated, all the changes that you are making are being recorded and can be reviewed on the review page of the task editor. It displays the history of changes that were made to a task, it is not possible to delete information that was recorded there.
Make a change to the ontology, e.g. add a synonym, create a new concept and review your changes.
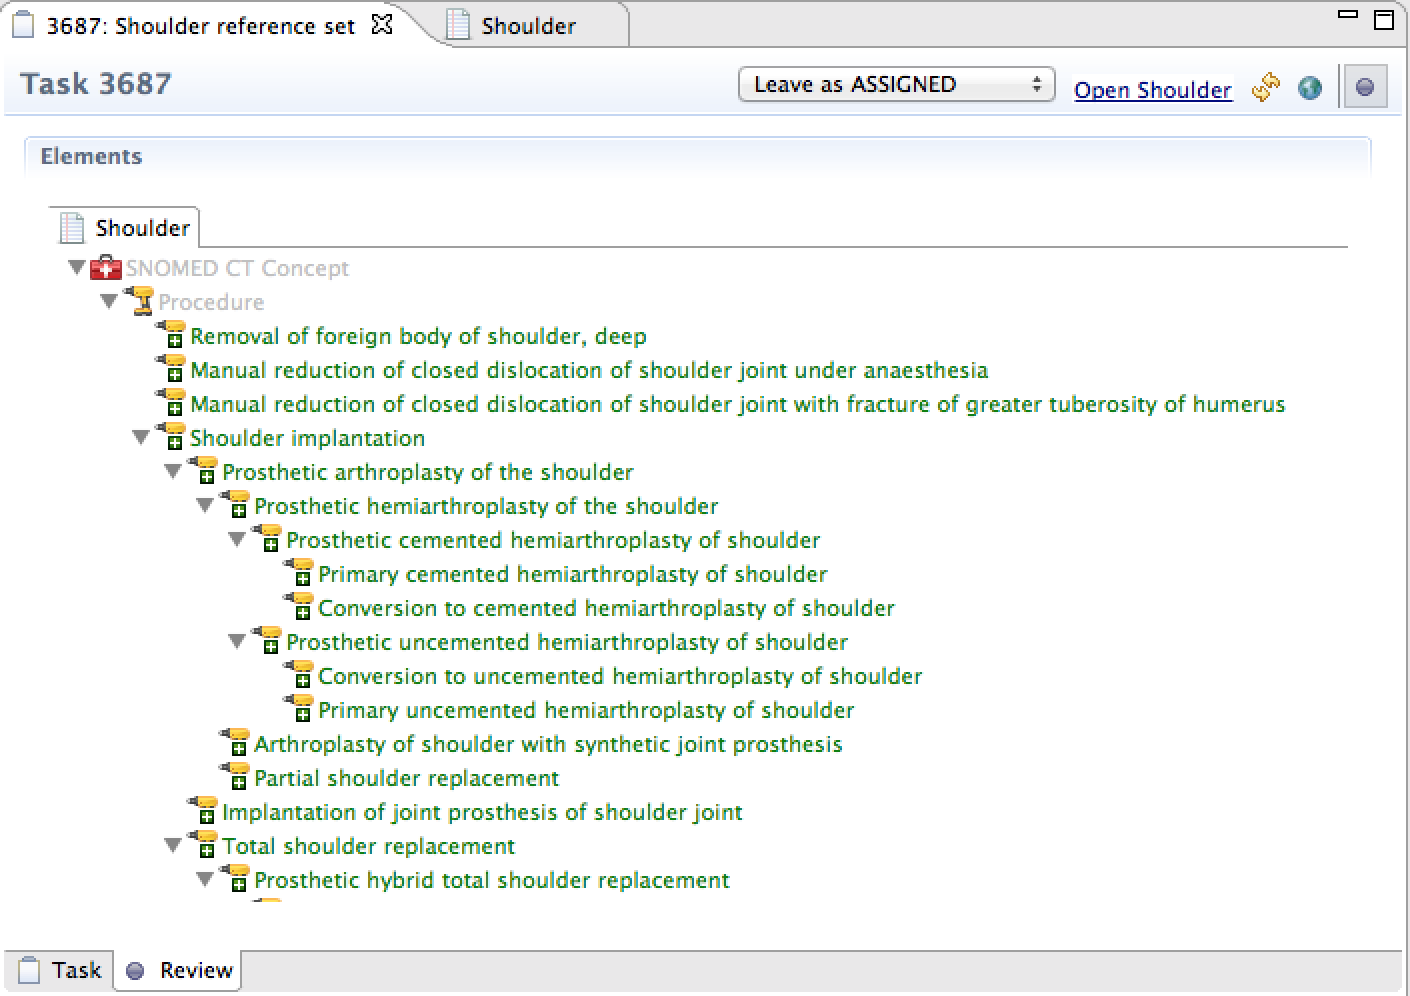
The review page displays the relevant parts of the concept hierarchy: If a concept, or any component associated with it has changed, it is displayed on this page with its parentage. If you click on a concept, you can see the types of modifications on the list below the tree (see screenshot). The icons associated with the changed concepts have a small additional icon indicating if they have been added, changed, or deleted/inactivated. You can also open the concept editor by double-clicking on a concept.
Once you finished working on your task, the following steps are necessary to push the workflow forward:

If your role is a reviewer you first meet the task when it is already in a FIXED state. You can scan through the changes on the review page of the editor, but to be able to view the components that were created or changed in the context of the task you need to activate the task.
If you are happy with the work performed, select Accept from the drop-down menu on the review page, and Save. You can use the text field to write a comment.

Now you need to set the status to Mark as VERIFIED, and save. The status will change from RESOLVED to VERIFIED.
If you are not happy with the work performed, the task can be reopened and handed back to the author. Alternatively, a different author can be assigned by entering the user name of a new team member in the Assignees section. In this case, the status will change from RESOLVED to REOPENED.
After a task reached the VERIFIED state it is ready to be promoted and committed into the main repository. Click the Promote icon
![]() in the toolbar. If it is disabled the task might not have been reviewed and verified, or there were changes on the main repository that aren't reflected on the task and you need to synchronize first. You can only promote a task if your role is a reviewer or adjudicator.
in the toolbar. If it is disabled the task might not have been reviewed and verified, or there were changes on the main repository that aren't reflected on the task and you need to synchronize first. You can only promote a task if your role is a reviewer or adjudicator.
After a successful promotion the status of the task changes from VERIFIED to CLOSED, the task is automatically inactivated. From this point it can only be viewed but not reopened anymore. In the task view, green font indicates that a task was completed today; grey font indicates that it was completed in the past (but not today).
This use case describes reference set authoring with one author and one reviewer. The task is to create a new reference set.
To invoke the task wizard, click the button
![]() in the Task view. Alternatively you can use the main menu: File > New > Snow Owl > New Task
in the Task view. Alternatively you can use the main menu: File > New > Snow Owl > New Task
On the first page of the wizard you are prompted to select
Hit Next to continue.
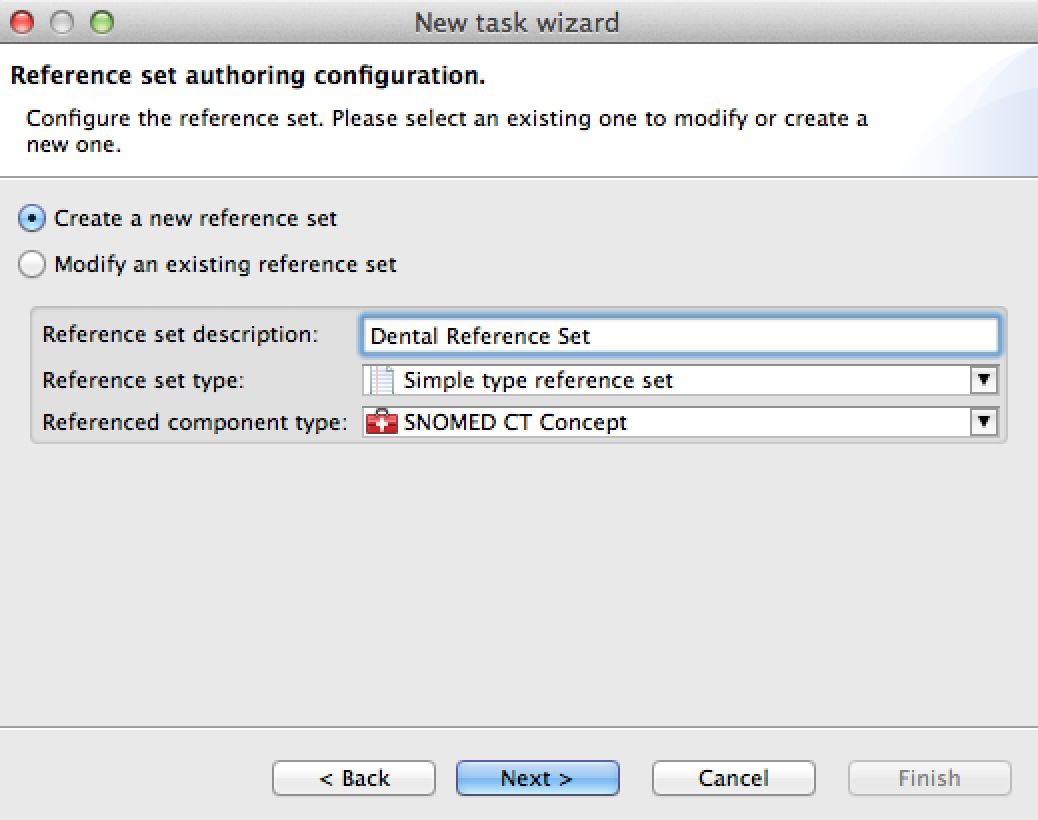
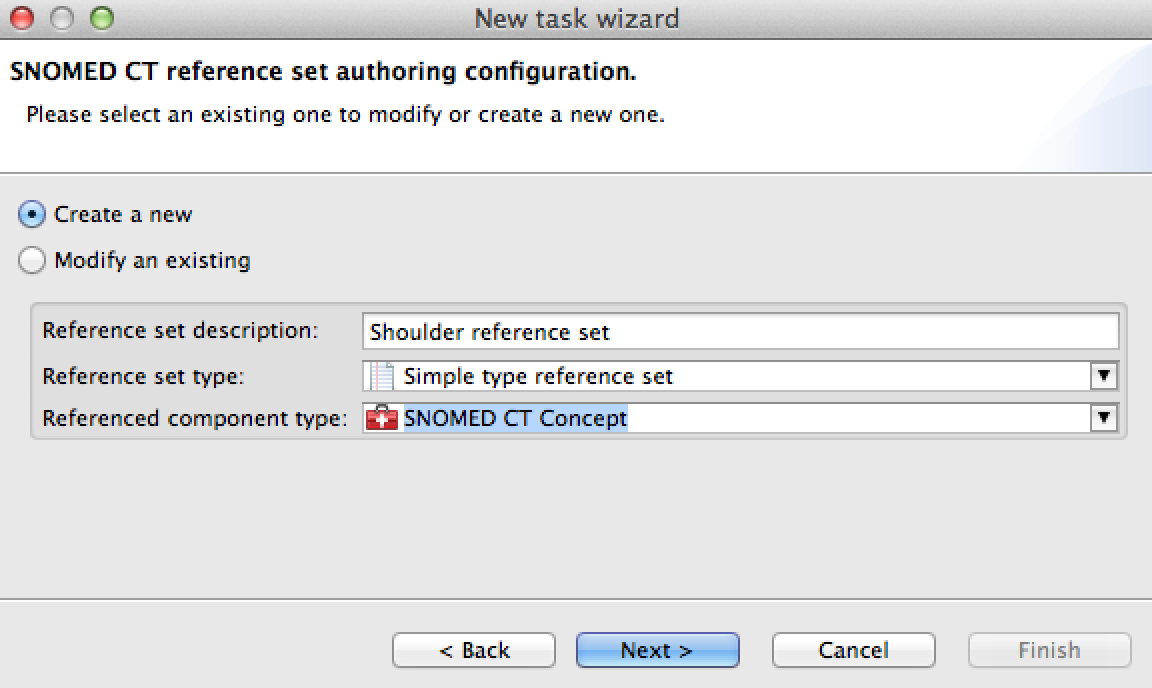
On the second page of the task editor for reference set authoring, you have to specify if you want to create a new reference set, or modify an existing one. In this use case, we would like to create a new reference set. Set the following specifications
Hit Next to proceed.
Note: If you want to modify an existing reference set, select this option and enter the name of the reference set.
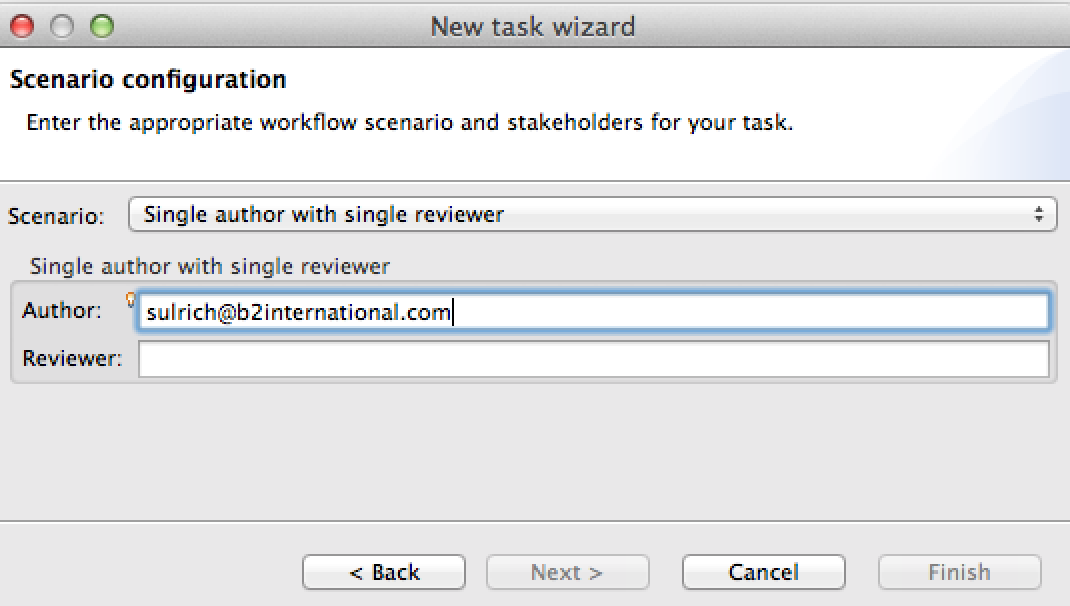
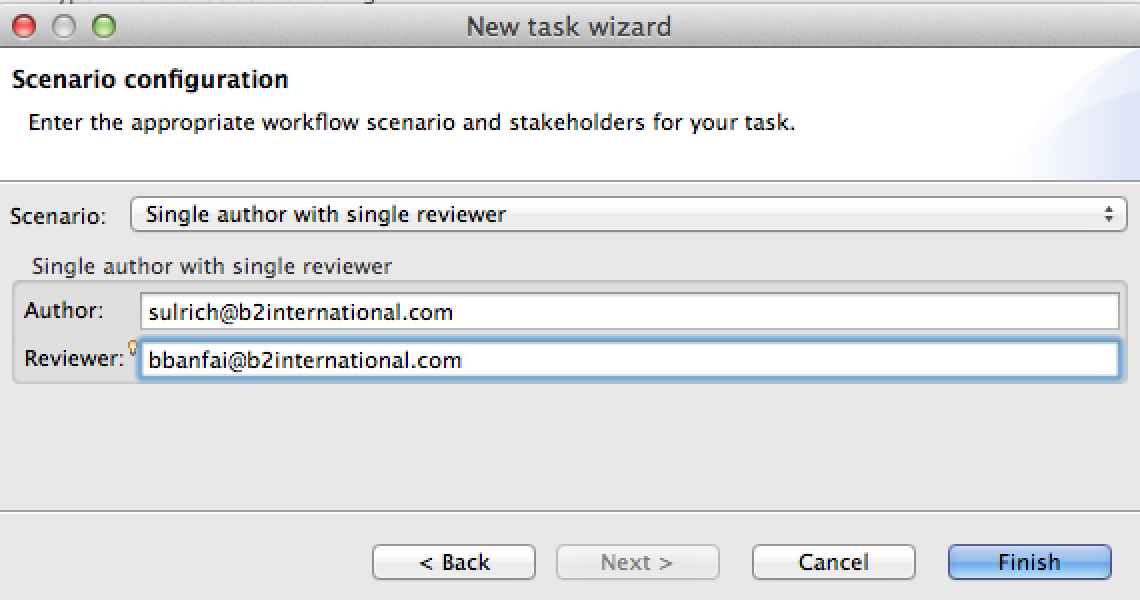
On the third page of the task editor you have to specify the scenario.
Hit'' Finish'' to complete the process.
Once you have decided to start working on a task, you need to activate that task. Only one task can be activated at a time. Activating the task means that you entered the collaborative mode, and the changes you are making are only visible to other users that have the same task activated.
To activate your task click on the purple circle in the toolbar. A frame will appear around the circle indicating that the task is active (see screenshot). You can also activate your task by clicking on the circle in the task view.
After the activation an information dialog allows changing into the reference set perspective. A simple type reference set is automatically generated, its name was specified in the task editor as Reference set description. The reference set is only visible when working on the branch, you can find it in the reference set view. Click on the link in the toolbar to open the new reference set. Now you can add members to the reference set.
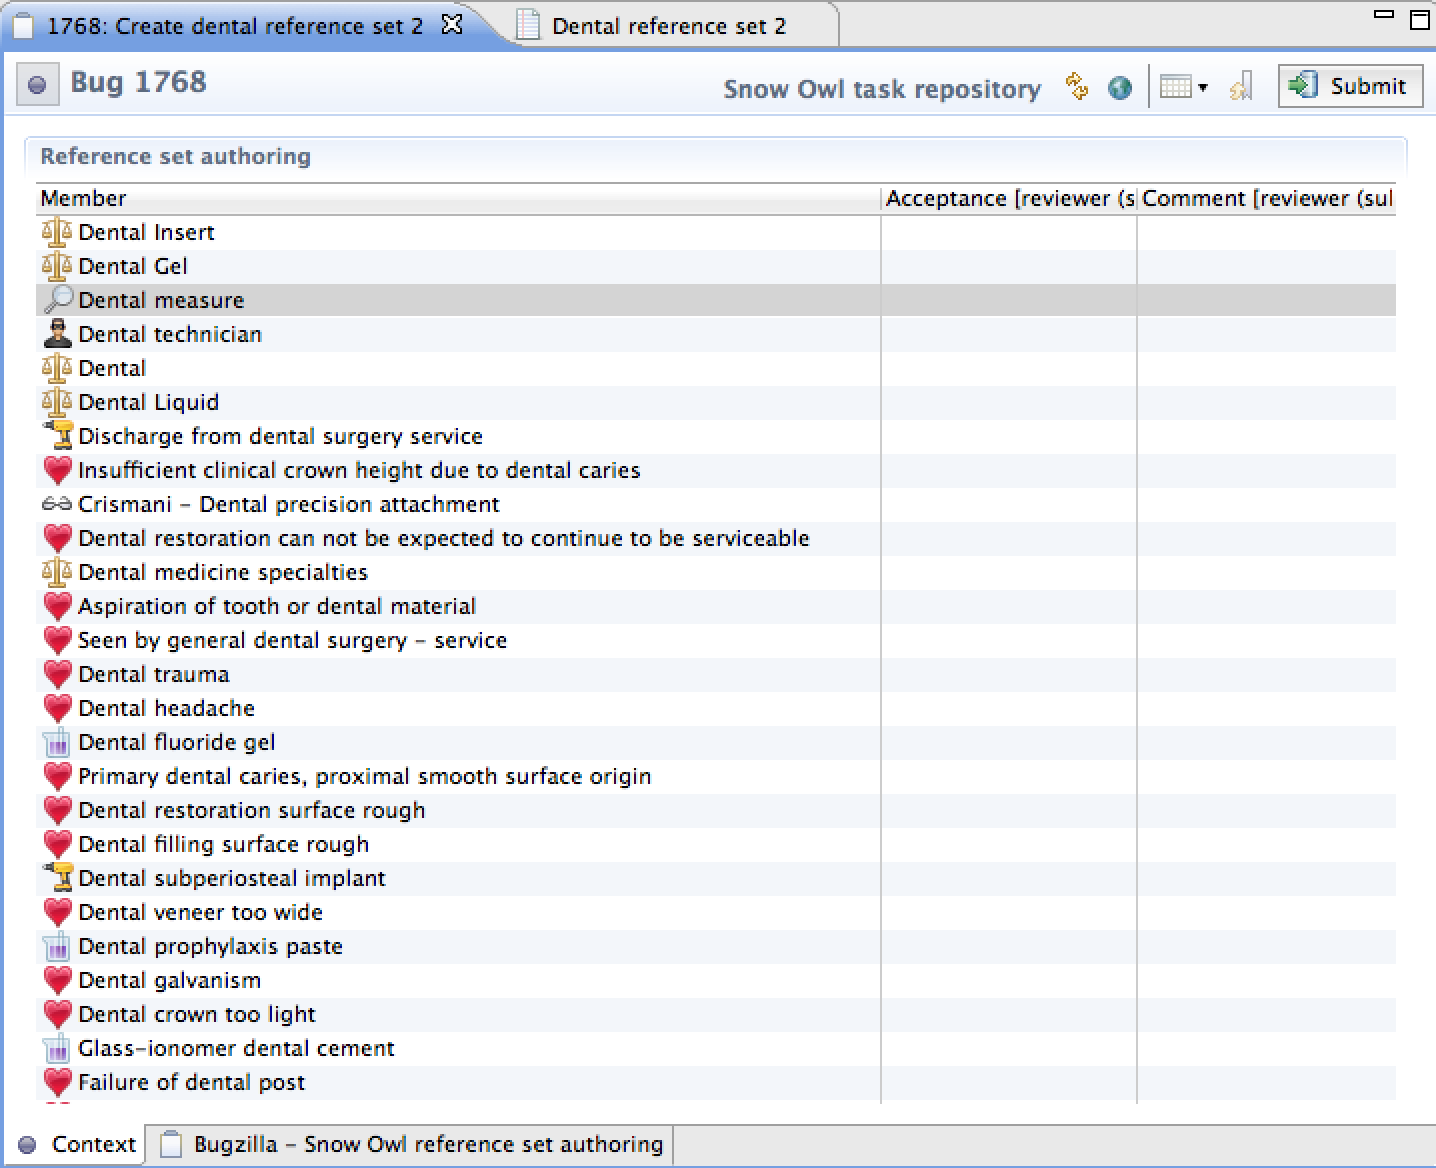
The review page displays changes made during working on a branch. In this case, it shows the members that were added to the reference set as a table. You can use the table to open the concept editor by double-clicking on a concept. Please note that the reference set has to be saved before its members are displayed on the review page. Members that are deleted during the authoring process will also be removed from the review page. The review page reflects the latest saved version of the reference set.
Once you've completed work on the reference set, the following steps are necessary to push the workflow forward:
If your role is a reviewer you first meet the task when it is already in a FIXED state. You can scan through the changes on the review tab of the editor, but to be able to accept or deny the work done you need to activate it. As a reviewer you can decide which reference set members should be included in the final reference set.
Only reference set members that were accepted will be submitted for promotion. Please note that members that were denied or not reviewed will be excluded. It's also possible to write a comment, e.g. reason for denial.

Once the review is completed, make sure you save your review, set the status to Mark as VERIFIED, and save the status change. The status will change from RESOLVED to VERIFIED.
If you are not happy with the work performed, the task can be reopened and handed back to the author. Alternatively, a different author can be assigned by entering the user name of a new team member in the Assignees section. The status will change from RESOLVED to REOPENED.
After a task reached the VERIFIED state it is ready to be promoted and committed into the main repository. Click the Promote icon
![]() in the toolbar. If it is disabled the task might not have been reviewed and verified, or there were changes on the main repository that aren't reflected on the task and you need to synchronize first. You can only promote a task if your role is a reviewer or adjudicator.
in the toolbar. If it is disabled the task might not have been reviewed and verified, or there were changes on the main repository that aren't reflected on the task and you need to synchronize first. You can only promote a task if your role is a reviewer or adjudicator.
After a successful promotion the status of the task changes from VERIFIED to CLOSED, the task is automatically inactivated. From this point it can only be viewed but not reopened anymore. In the task view, green font indicates that a task was completed today; grey font indicates that it was completed in the past (but not today).
This use case describes mapping authoring with one author and one reviewer. The task is to create a new reference set.
To invoke the task wizard, click the button
![]() in the Task view. Alternatively you can use the main menu:
File > New > Snow Owl > New Task
in the Task view. Alternatively you can use the main menu:
File > New > Snow Owl > New Task
On the first page of the wizard you are prompted to select
Hit Next to continue.
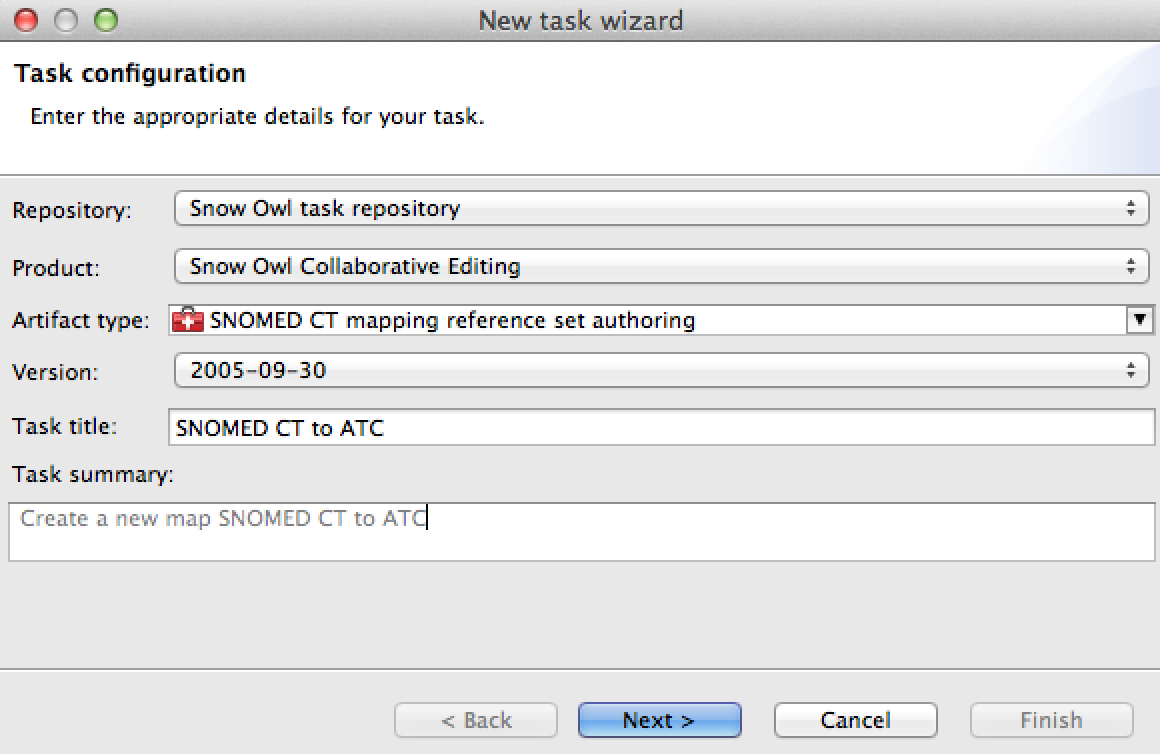
On the second page of the task editor for mapping authoring, you have to specify if you want to create a new map, or modify an existing one. In this use case, we would like to create a new map. The referenced component should be SNOMED CT, the map target ATC. Set the following specifications
Hit Next to proceed.
Note: If you chose to modify an existing reference set, you have to specify the map you want to work on. The quick search function will automatically display matches once you start entering the name of the map.

On the third page of the task editor you have to specify the scenario.
Hit'' Finish'' to complete the process.
Once you have decided to start working on a task, you need to activate that task. Only one task can be activated at a time. Activating the task means that you entered the collaborative mode, and the changes you are making are only visible to other users that have the same task activated.
To activate your task click on the purple circle in the toolbar. A frame will appear around the circle indicating that the task is active (see screenshot). You can also activate your task by clicking on the circle in the task view.
After the activation an information dialog allows changing into the mapping perspective. A simple map type reference set will be automatically generated, its name was specified in the task editor as Reference set description. The map type reference set is only visible when working on the branch, you can find it in the reference set view. Open the new map type reference set by clicking on the link in the toolbar, and start mapping.

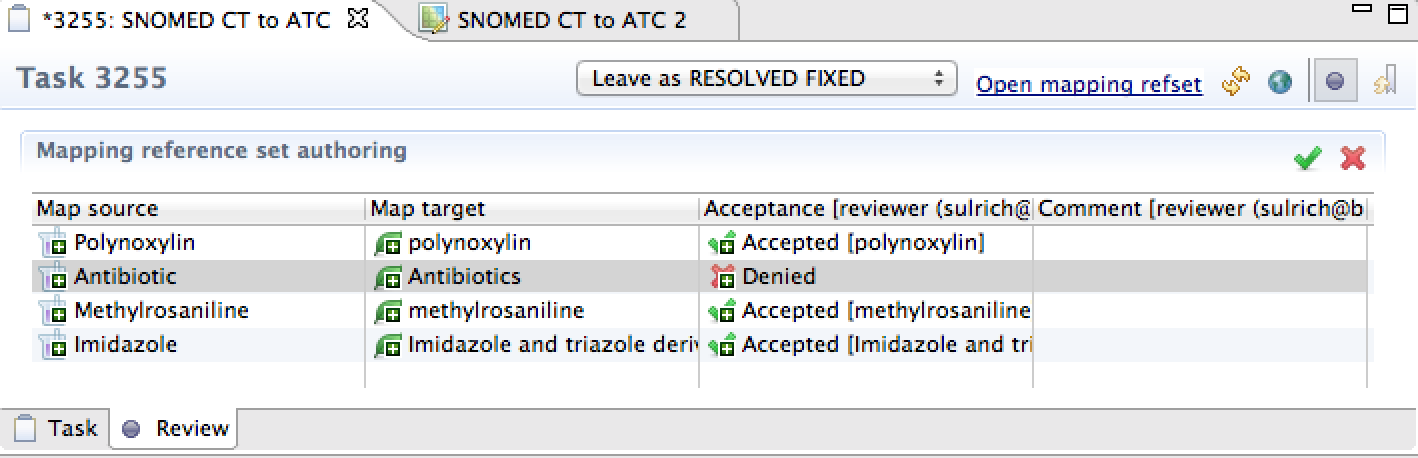
The review page displays changes made during working on a branch. The table shows the concepts that were mapped. Please note that the map has to be saved before its members are displayed on the review page. Mappings that are deleted during the authoring process will also be removed from the review page. It reflects the latest saved version of the map.

Once you've completed work on the reference set, the following steps are necessary to push the workflow forward:
If your role is a reviewer you first meet the task when it is already in a FIXED state. You can scan through the changes on the review page of the editor, but to be able to accept or deny the work done you need to activate it. As a reviewer you can decide which mappings should be included in the final map type reference set.
Only mappings that were accepted will be submitted for promotion. Mappings that were denied or not reviewed will be excluded. It's also possible to write a comment, e.g. reason for denial, suggestion for different mapping.
Once the review is completed, make sure you save your review, set the status to Mark as VERIFIED, and save the status change. The status will change from RESOLVED to VERIFIED.
If you are not happy with the work performed, the task can be reopened and handed back to the author. Alternatively, a different author can be assigned by entering the user name of a new team member in the Assignees section. The status will change from RESOLVED to REOPENED.
After a task reached the VERIFIED state it is ready to be promoted and committed into the main repository. Click the Promote icon
![]() in the toolbar. If it is disabled the task might not have been reviewed and verified, or there were changes on the main repository that aren't reflected on the task and you need to synchronize first. You can only promote a task if your role is a reviewer or adjudicator.
in the toolbar. If it is disabled the task might not have been reviewed and verified, or there were changes on the main repository that aren't reflected on the task and you need to synchronize first. You can only promote a task if your role is a reviewer or adjudicator.
After a successful promotion the status of the task changes from VERIFIED to CLOSED, the task is automatically inactivated. From this point it can only be viewed but not reopened anymore. In the task view, green font indicates that a task was completed today; grey font indicates that it was completed in the past (but not today).
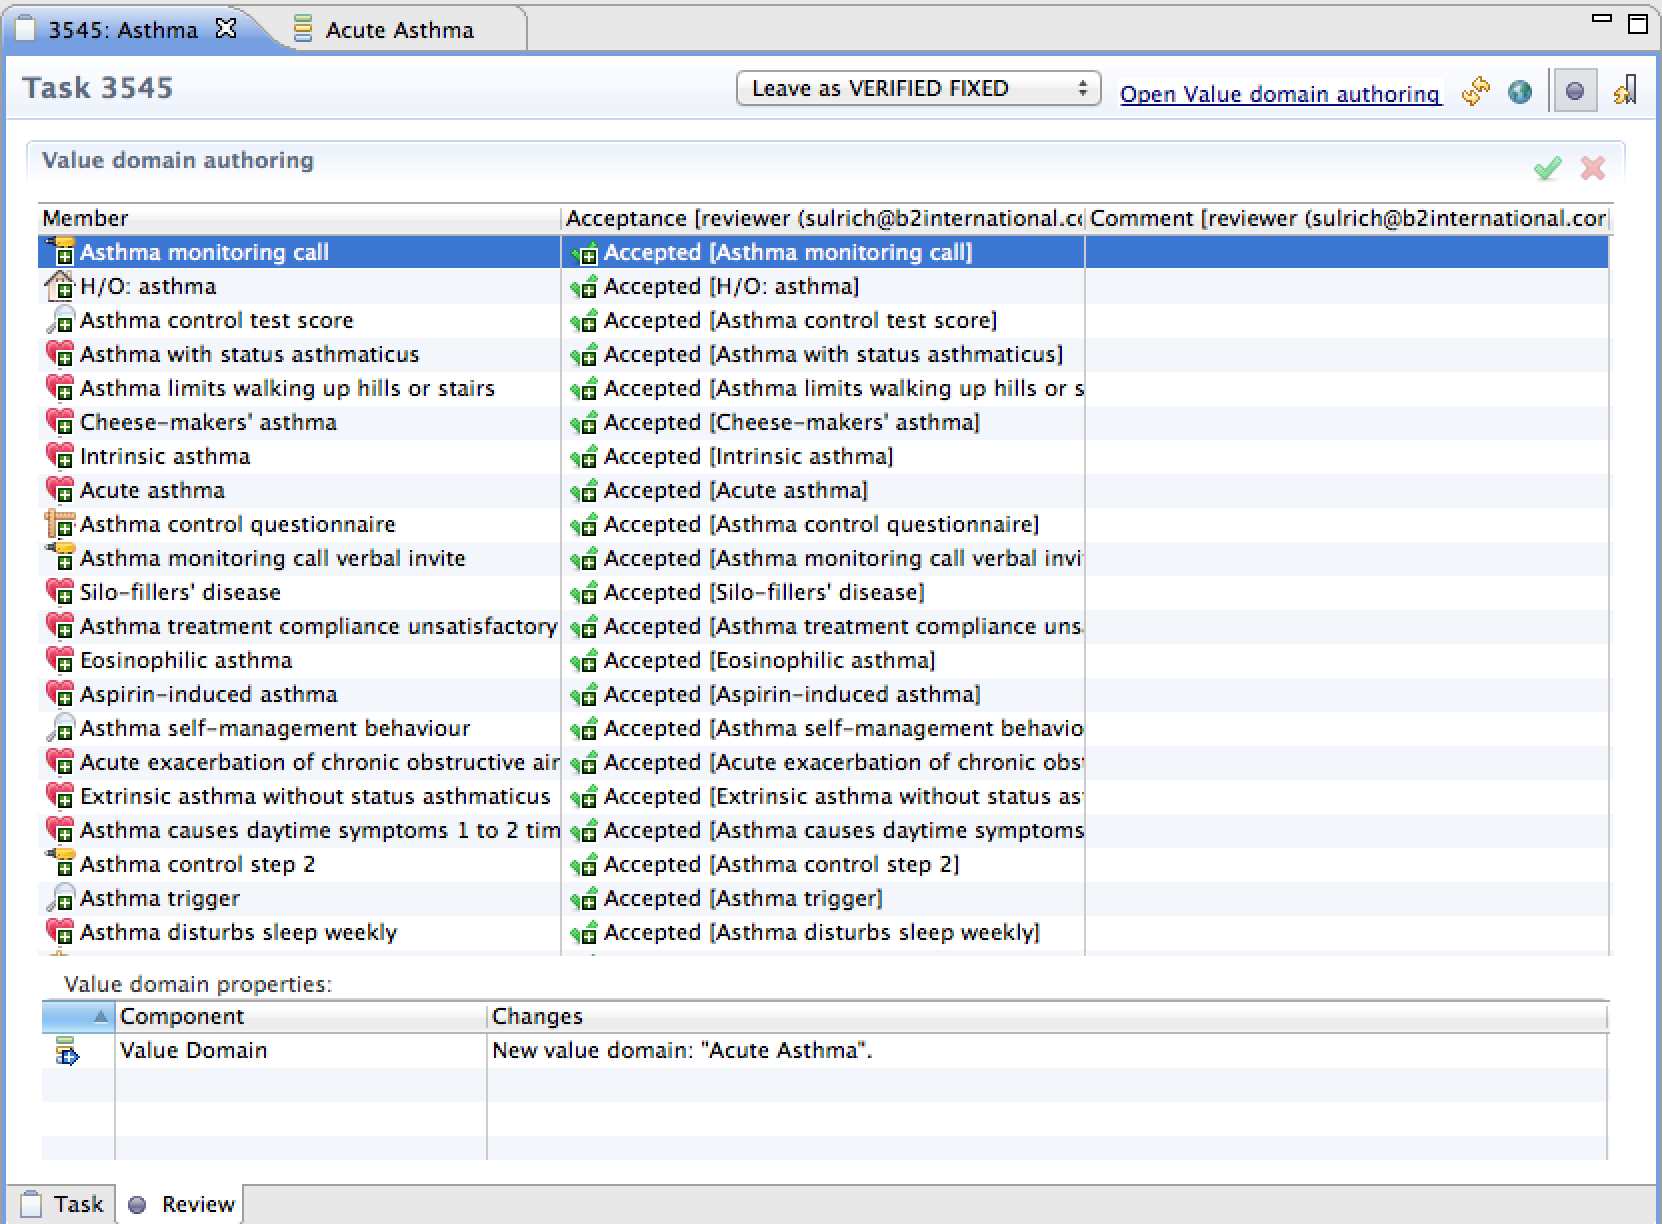
This use case describes value domain authoring with one author and one reviewer. The task is to create a new value domain.
To invoke the task wizard, click the button
![]() in the Task view. Alternatively you can use the main menu: File > New > Snow Owl > New Task
in the Task view. Alternatively you can use the main menu: File > New > Snow Owl > New Task
On the first page of the wizard you are prompted to select
Hit Next to continue.
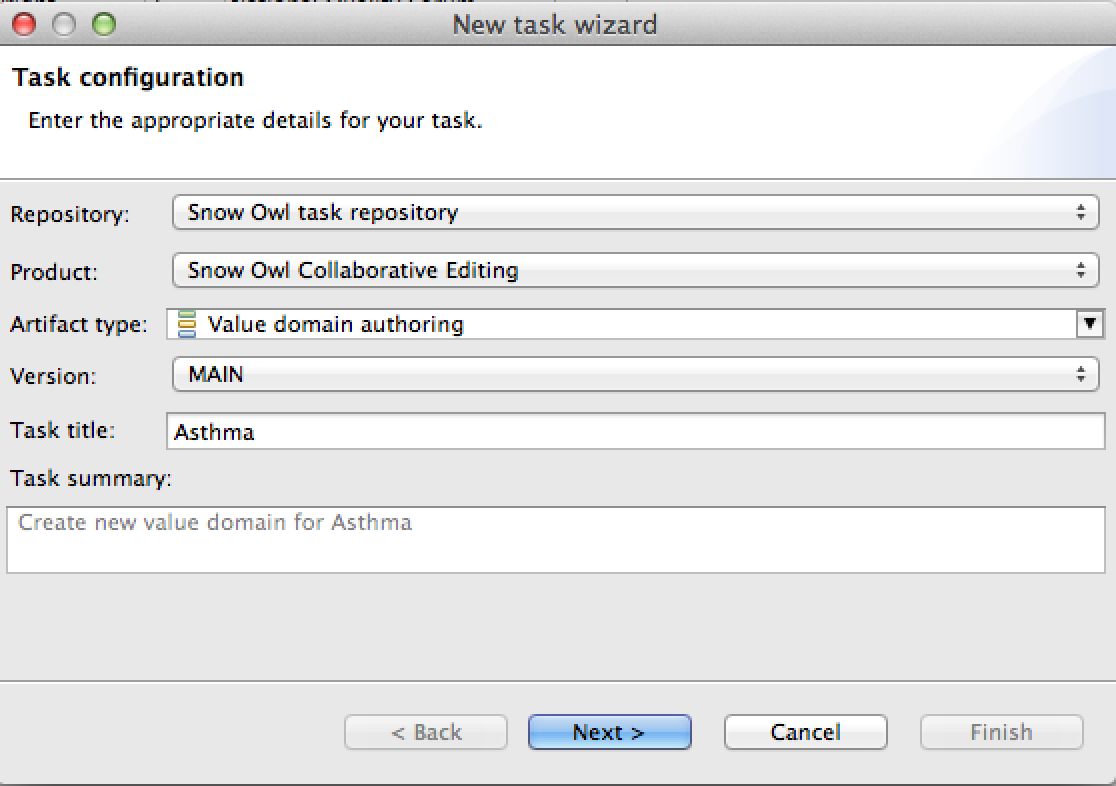
On the second page of the task editor for value domain authoring, you have to specify if you want to create a new value domain set, or modify an existing one. In this case, we will create a new value domain. You have to specify
Hit Next to proceed.
Note: If you selected to modify an existing value domain you need to enter the name of the value domain you want to work on.

On the third page of the task editor you have to specify the scenario.
Hit'' Finish'' to complete the task generation.
Once you have decided to start working on a task, you need to activate that task. Only one task can be activated at a time. Activating the task means that you entered the collaborative mode, and the changes you are making are only visible to other users that have the same task activated.
To activate your task click on the purple circle in the toolbar. A frame will appear around the circle indicating that the task is active (see screenshot). You can also activate your task by clicking on the circle in the task view.
After the activation an information dialog allows changing into the value domain perspective. A value domain will be automatically generated, it's only visible when working on the branch. You can open it either from the value domain view or by using the link in the toolbar. Add members to the value domain.

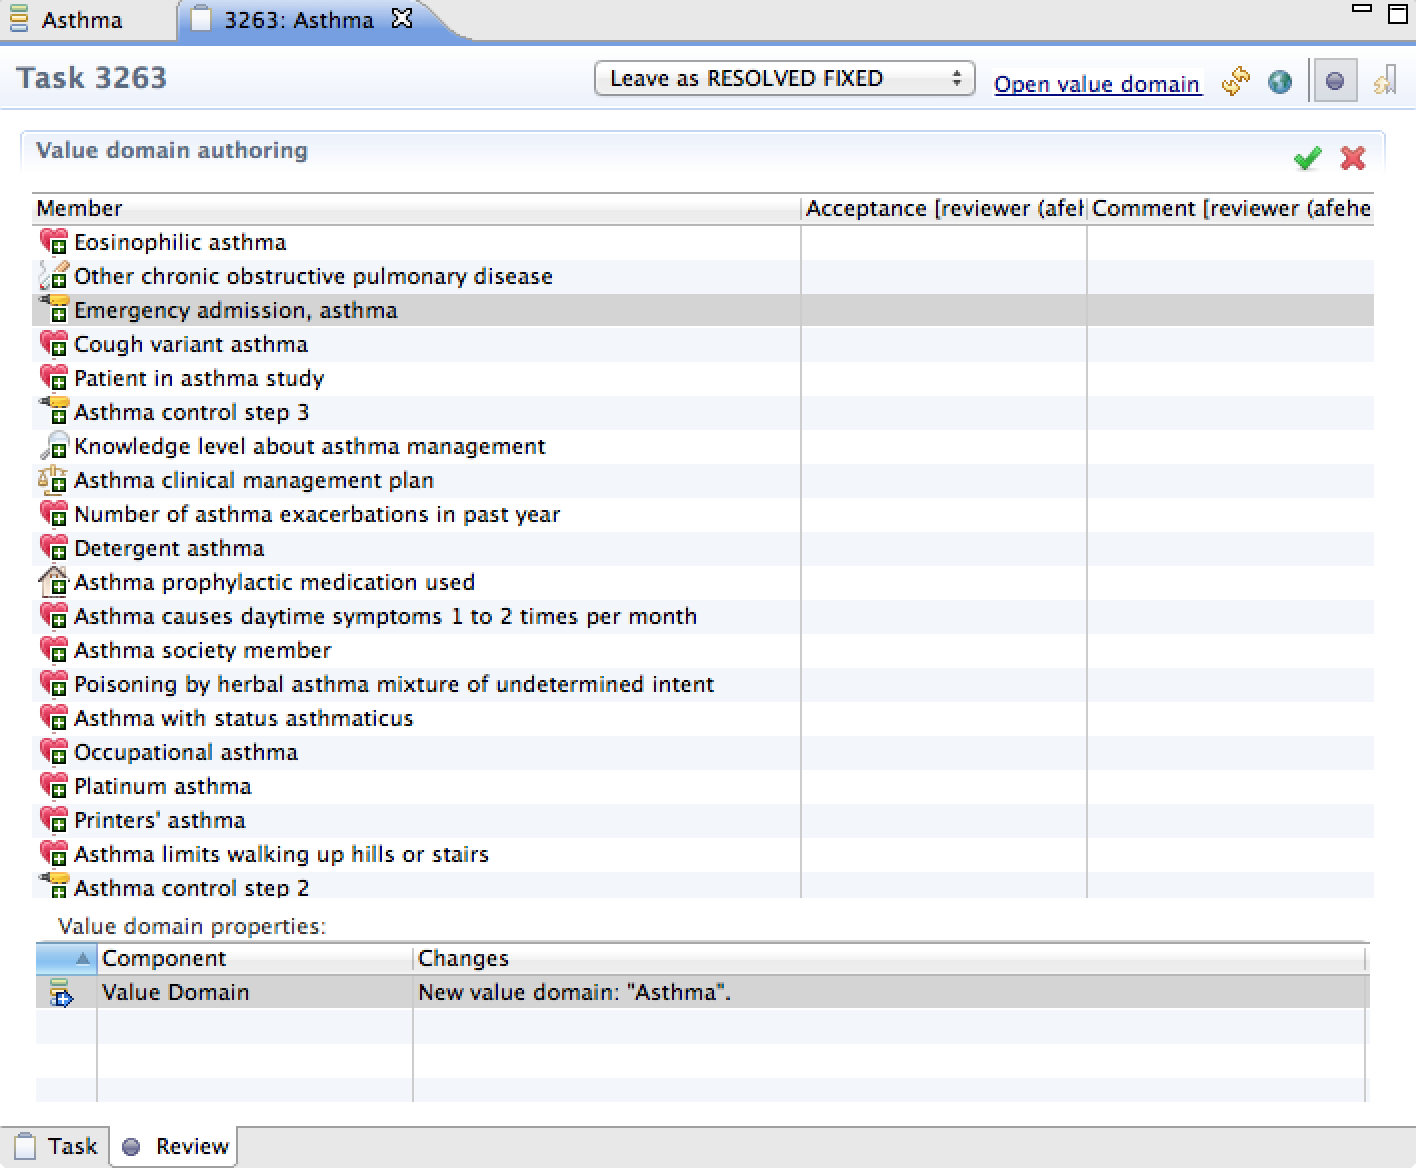
The review page displays changes made during working on a branch. In this case, it shows the members that were added to the value domain. You can use the table to open the concept editor by double-clicking on a concept. Please note that the value domain has to be saved before its members are displayed on the review page. Members that are deleted during the authoring process will also be removed from the review page. The review page reflects the latest saved version of the value domain.
Once you've completed work on the value domain, the following steps are necessary to push the workflow forward:
If your role is a reviewer you first meet the task when it is already in a FIXED state. You can scan through the changes on the review tab of the editor, but to be able to accept or deny the work done you need to activate it. As a reviewer you can decide which members should be included in the final value domain.
Only members that were accepted will be submitted for promotion. Please note that members that were denied or not reviewed will be excluded. It's also possible to write a comment, e.g. reason for denial.
Once the review is completed, make sure you save your review, set the status to Mark as VERIFIED, and save the status change. The status will change from RESOLVED to VERIFIED.
If you are not happy with the work performed, the task can be reopened and handed back to the author. Alternatively, a different author can be assigned by entering the user name of a new team member in the Assignees section. The status will change from RESOLVED to REOPENED.
After a task reached the VERIFIED state it is ready to be promoted and committed into the main repository. Click the Promote icon
![]() in the toolbar. If it is disabled the task might not have been reviewed and verified, or there were changes on the main repository that aren't reflected on the task and you need to synchronize first. You can only promote a task if your role is a reviewer or adjudicator.
in the toolbar. If it is disabled the task might not have been reviewed and verified, or there were changes on the main repository that aren't reflected on the task and you need to synchronize first. You can only promote a task if your role is a reviewer or adjudicator.
After a successful promotion the status of the task changes from VERIFIED to CLOSED, the task is automatically inactivated. From this point it can only be viewed but not reopened anymore. In the task view, green font indicates that a task was completed today; grey font indicates that it was completed in the past (but not today).
This use case describes map type reference set authoring with two independent authors and one reviewer. The task is to create a new map type reference set.
To invoke the task wizard, click the button
![]() in the Task view. Alternatively you can use the main menu: File > New > Snow Owl > New Task
in the Task view. Alternatively you can use the main menu: File > New > Snow Owl > New Task
On the first page of the wizard you are prompted to select
Hit Next to continue.
On the second page of the task editor for mapping authoring, you have to specify if you want to create a new map, or modify an existing one. In this use case, we would like to create a new map. The referenced component should be SNOMED CT, the map target ATC. Set the following specifications
Hit Next to proceed.
Note: If you chose to modify an existing reference set, you have to specify the map you want to work on. The quick search function will automatically display matches once you start entering the name of the map.
On the third page of the task editor you have to specify the scenario.
Hit'' Finish'' to complete the process.
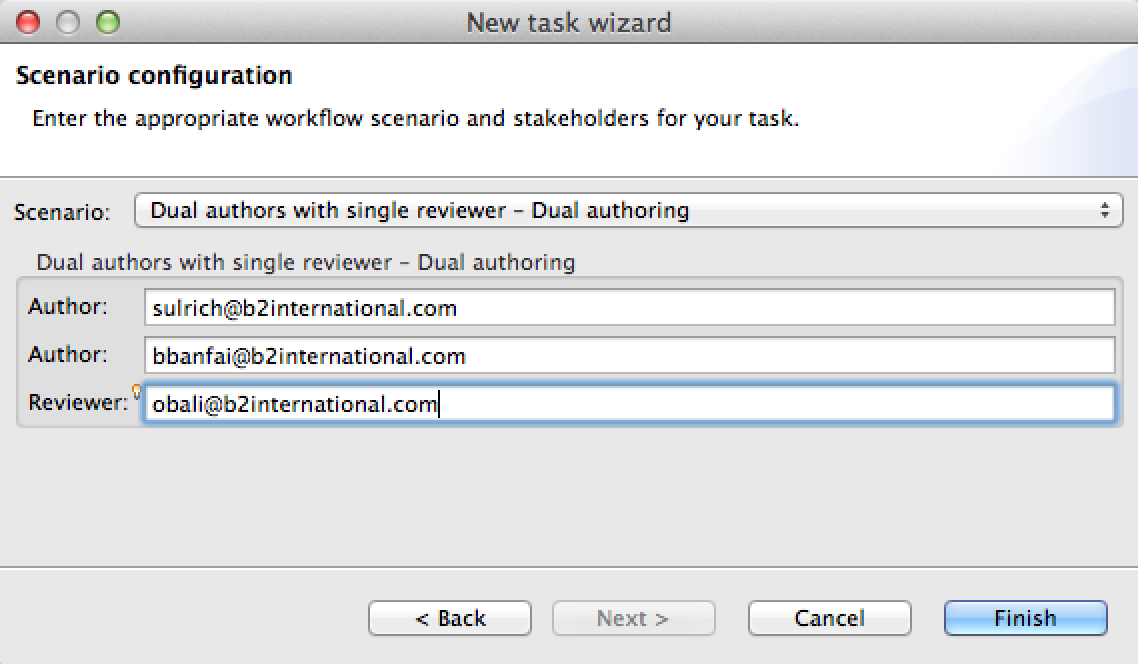
In the dual blind scenario, three tasks are generated
You can see the tasks in the task list. Open the node to see the tasks for the authors.

In the dual blind scenario, the authors are working independently on two separate branches. This means that they can't see each others work. To start working on their branch, the authors have to activate the task by clicking on the circle next to the task name in the task editor. For each branch a simple type map reference set will be automatically generated, its name of was specified in the task editor as Reference set description. The map is only visible when working on the branch, it can be found in the reference set view. The authors need to open the new map to add members.
Once the authors start mapping and saving their mappings, they can review their work on the review tab . The table shows the concepts that were mapped. Since they are working on a branch, an author can only his own mappings, not the work of the other author.

Once the work is completed, the authors need to
The task status will change from ASSIGNED to RESOLVED, in the task view, the task is crossed out.
If your role is a reviewer you first meet the task when it is ASSIGNED to you. You can see the work of the authors on the review page of the editor. In the dual blind scenario, the parent task can not be activated. To be able to able to accept or deny the work of the authors you need to set the task states to RESOLVE AS FIXED and save the status.
As a reviewer you can decide which mappings should be included in the final map type reference set. The mappings of the two authors can be easily compared in the table: The first column displays the map source, the next columns show the map targets by author.
To accept or deny a mapping, click on the respective cell in the table. If the authors suggested different mappings, both map targets are available in the drop-down list. Only mappings that were accepted will be submitted for promotion. Members that were denied or not reviewed will be excluded. It's also possible to write a comment, e.g. reason for denial, suggestion for different mapping.

Once the review is completed, make sure you save your review, synchronize, set the status to Mark as VERIFIED, and save. The status will change from RESOLVED to VERIFIED.
If you are not happy with the work performed, the task can be reopened and handed back to the author. Alternatively, a different author can be assigned by entering the user name of a new team member in the People section. The status will change from RESOLVED to REOPENED.
After a task reached the VERIFIED state it is ready to be promoted and committed into the main repository.
Go to the review page of the editor, and click
Promote
![]() . If it is disabled that means that the task has not been reviewed and verified, or that there were changes on the main repository that aren't reflected on the task and you need to synchronize first.
. If it is disabled that means that the task has not been reviewed and verified, or that there were changes on the main repository that aren't reflected on the task and you need to synchronize first.
After a successful promotion the status of the task changes from VERIFIED to CLOSED, the parent task is automatically inactivated. From this point it cannot be reopened anymore. On the task list the item will be crossed out. The new map type reference set is added to the main repository.

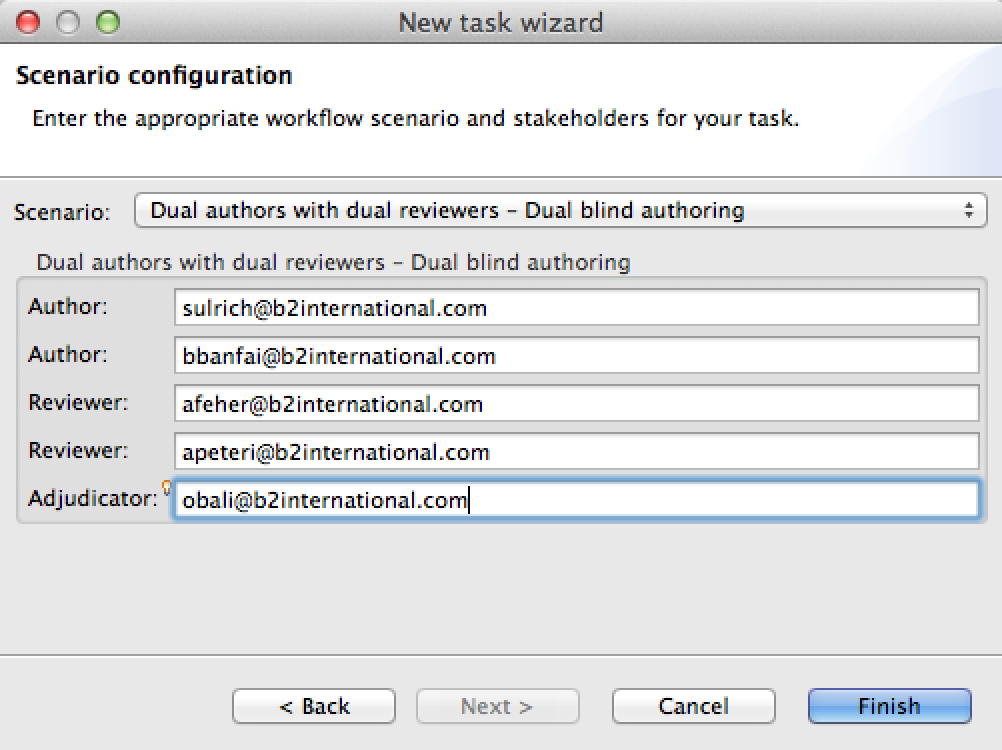
This use case describes reference set authoring with two authors and two reviewer. The task is to create a new reference set.
To invoke the task wizard, click the button
![]() in the Task view. Alternatively you can use the main menu: File > New > Snow Owl > New Task
in the Task view. Alternatively you can use the main menu: File > New > Snow Owl > New Task
On the first page of the wizard you are prompted to select
Hit Next to continue.
On the second page of the task editor for reference set authoring, you have to specify if you want to create a new reference set, or modify an existing one. In this use case, we would like to create a new reference set. Set the following specifications
Hit Next to proceed.
Note: If you want to modify an existing reference set, select this option and enter the name of the reference set.
On the third page of the task editor you have to specify the scenario.
Hit Finish to complete the process.
As an author, you will be working independently on a branch. You won't be able to see the work of the other author. It's also not possible for you to see who the other author is, the Assignees sections only displays the user who created the task. To activate a task open the task in the editor, and click on the circle next to the task name. A frame will appear around the circle indicating that the task is active. For your branch, a simple type reference set will be automatically generated, its name was specified in the task editor as Reference set description. The reference set is only visible when working on the branch, you open it from the reference set view or by clicking the link in the toolbar. Add members and save your changes.
The review page displays the changes that were saved while working on your branch. In this case, it shows the members that were added to the reference set as a hierarchy. The plus icon shows that a member was added. Please note that the reference set has to be saved before its members are displayed on the review tab. Members that are deleted during the authoring process will also be removed from the review tab. The review tab reflects the latest saved version of the reference set.
Once you've completed work on the reference set, the following steps are necessary to push the workflow forward:
As a reviewer, the task is automatically ASSIGNED to you. You can see the work of the authors on the review page of the editor. In the dual blind scenario, the parent task can not be activated. To be able to accept or deny the work of the authors, double-click on the parent task to open the editor, verify that the task state is RESOLVED FIXED, and save.
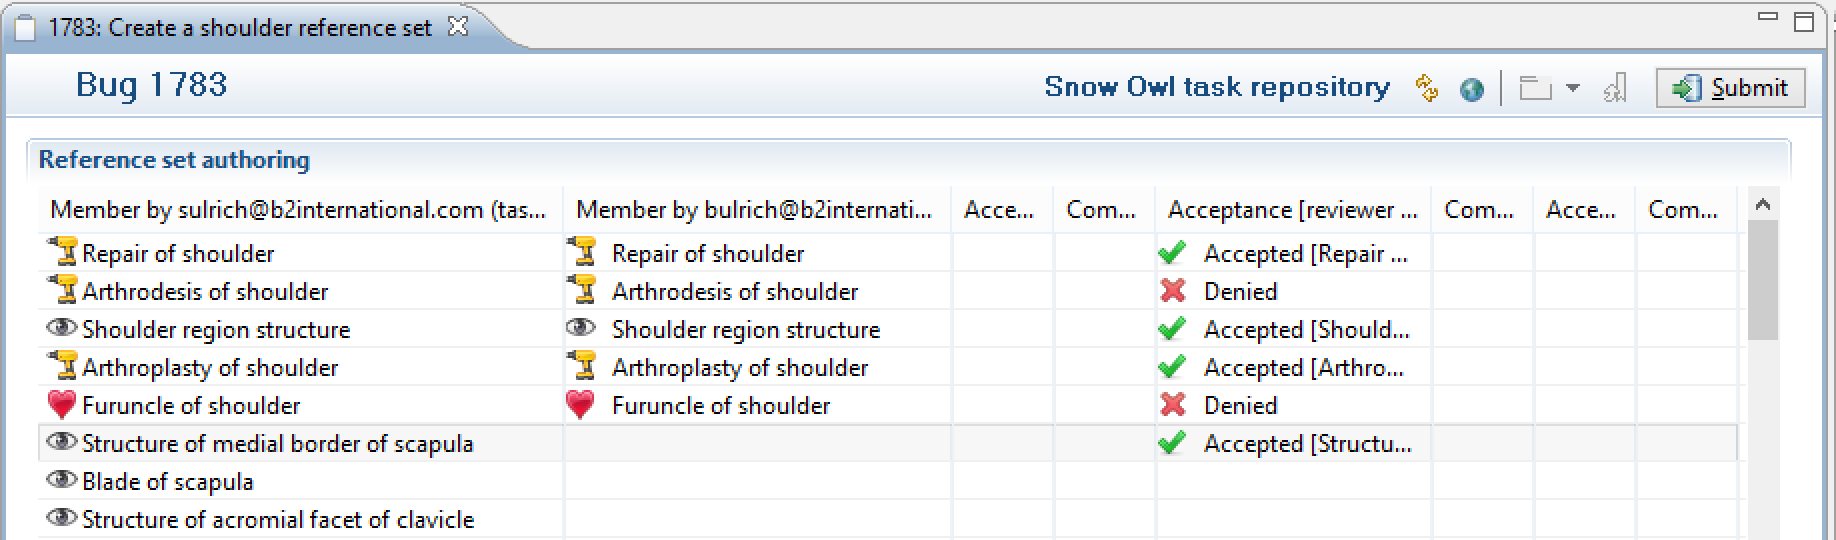
As a reviewer you can decide which concepts should be included in the final reference set. The work of the two authors can be compared in the table. Each line represents a reference set member that was added. The first column displays the reference set members that were added by author 1, the second column the ones by author 2. If both authors added the same concept, you can see the concept in both columns. If a concept was selected only by one author, it appears in the column for this author, the cell for the other author is empty.
On the review tab, two columns have been allocated for each reviewer. The Acceptance column is used to accept or deny the reference set membership. The Comment column for additional comments. To accept or deny a reference set member, go to the respective cell in the "Acceptance: Reviewer" column. Since the columns for both reviewers are displayed, you have to make sure that you are in the column with your user name. Now click in the cell in the table and select from the drop-down menu to accept or deny a reference set member. You can also write a comment in the cell next to it.
You can also use the toolbar buttons to accept or deny reference set members.
Only concepts that were accepted will be submitted for promotion. Members that were denied will be excluded. Please make sure to review all items. If a case is unresolved, because you did not enter a decision, the adjudicator won't be able to push the workflow forward.
If all cases were rejected, the promotion is also disabled.
Once the review is completed, save the review. Do not change the status of your work yet, this should only be done by the adjudicator.
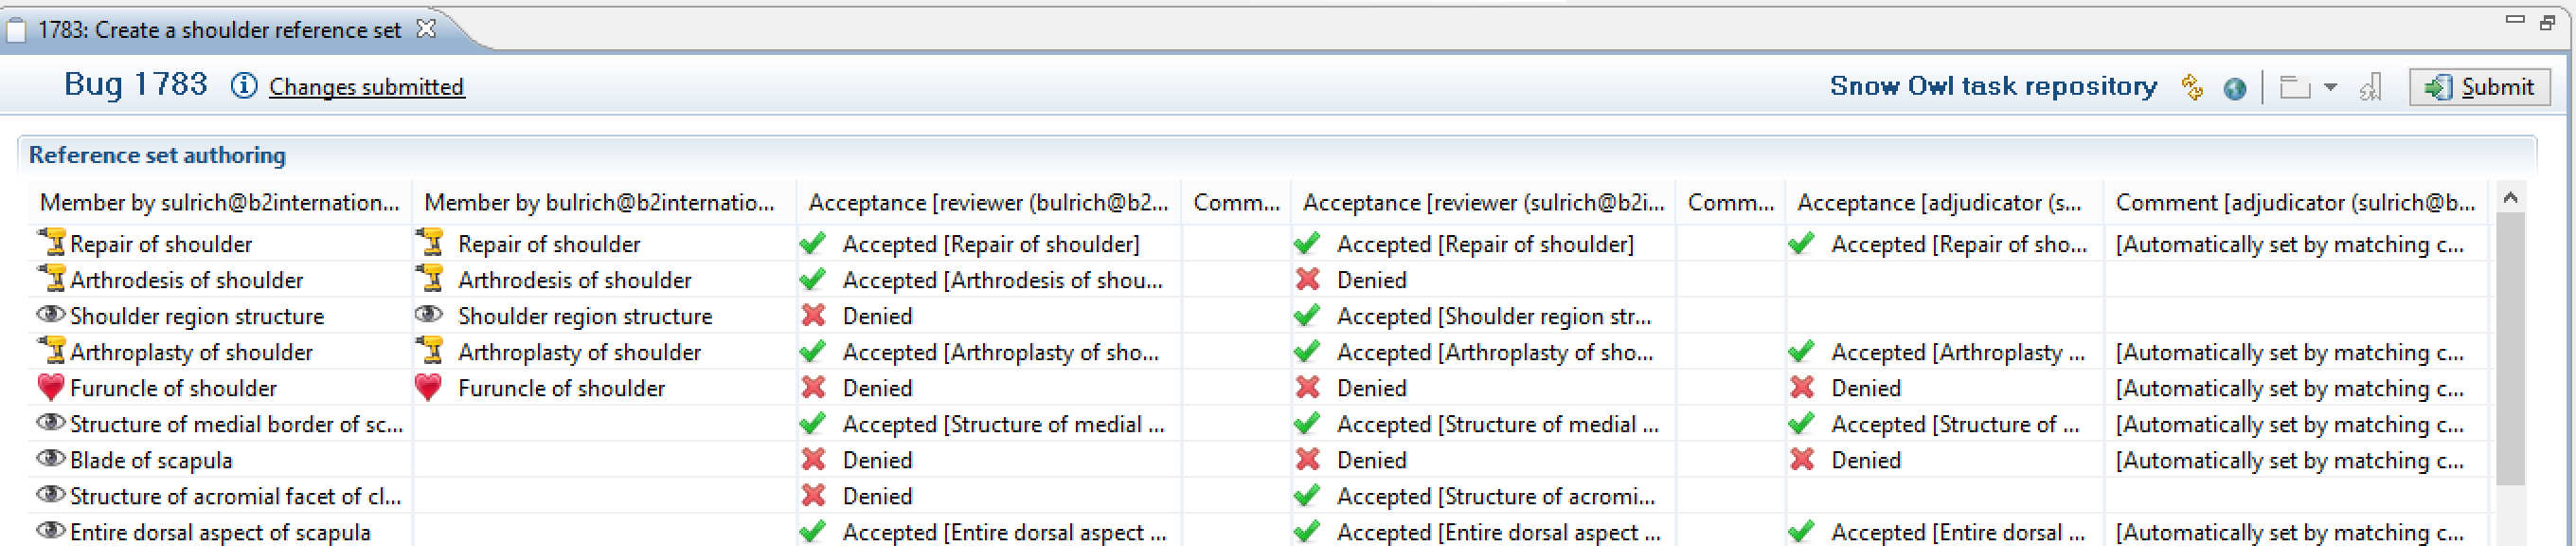
As the second reviewer, you can simply open the task and see which concepts were accepted and denied by your colleague. Go to the columns with your user name and click on the respective cell to accept or deny a reference set member. If both reviewers agree, the outcome of the review will be automatically displayed in the column of the adjudicator (Comment: Automatically set by choice of both reviewers). Please make sure to review all items. If a case is unresolved, because you did not enter a decision, the adjudicator won't be able to push the workflow forward.
Once you are done with your review, save your review. Do not change the task status.
Once both reviewers have accepted or rejected the changes and saved their review, the adjudicator can start working. As an adjudicator, you need to settle the cases in which the reviewers disagreed. Click on the cell and select accept or deny. Only concepts that were accepted will be promoted. If the reviewers are in agreement, there is no need for you to do anything and the cells are automatically filled. However, as an adjudicator, you can still overwrite the decision and change this manually. Once you completed the work, you can proceed with the workflow:
After a task reached the VERIFIED state it is ready to be promoted to main.
Go to the review page of the editor, and click
Promote
![]() . If it is disabled that means that the task has not been reviewed and verified, or that there were changes on the main repository that aren't reflected on the task and you need to synchronize first.
. If it is disabled that means that the task has not been reviewed and verified, or that there were changes on the main repository that aren't reflected on the task and you need to synchronize first.

After a successful promotion the status of the task changes from VERIFIED to CLOSED, the task is automatically inactivated. From this point it cannot be reopened anymore. The new reference set is added to the main repository.

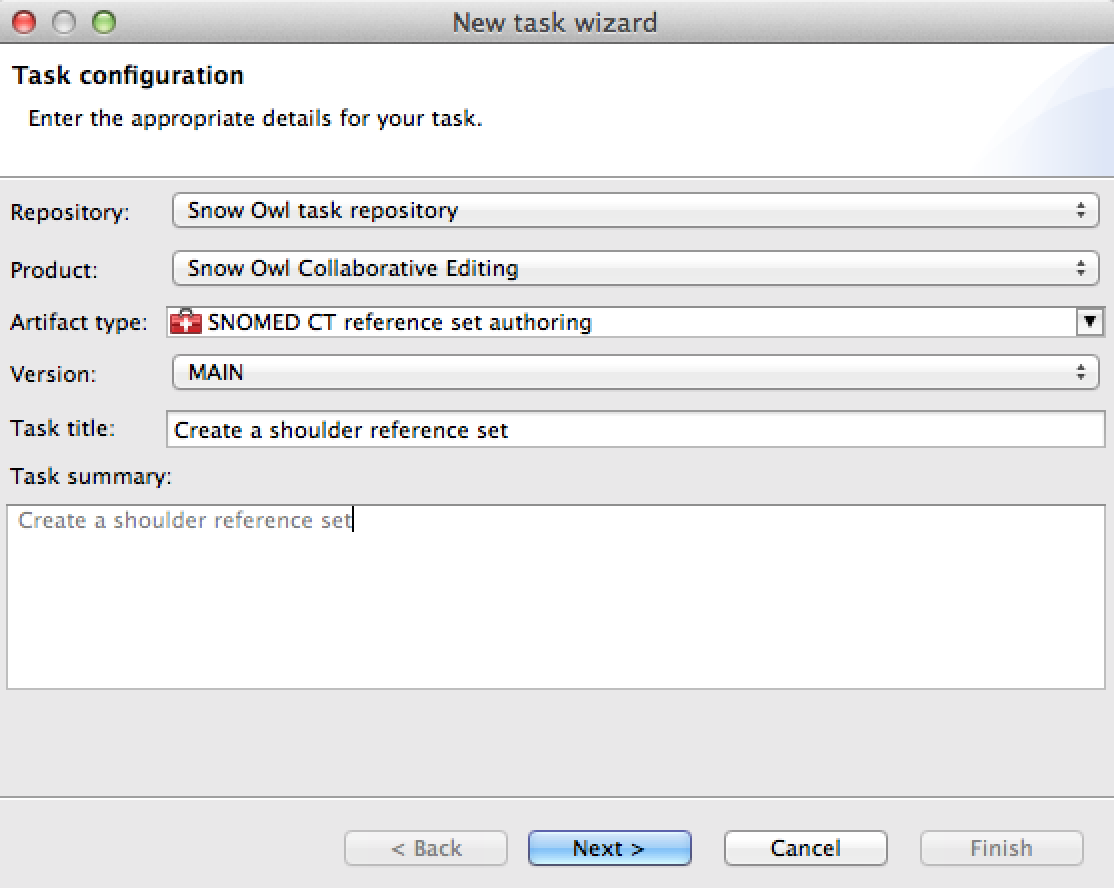
The following use case describes mapping set authoring with one author and one reviewer. The task is to create a new mapping set.
To invoke the task wizard, click the button
![]() in the Task view. On the first page of the wizard you are prompted to select
in the Task view. On the first page of the wizard you are prompted to select
Hit Next to continue.

Select Create a new on the next page, and specify information about the new mapping set:
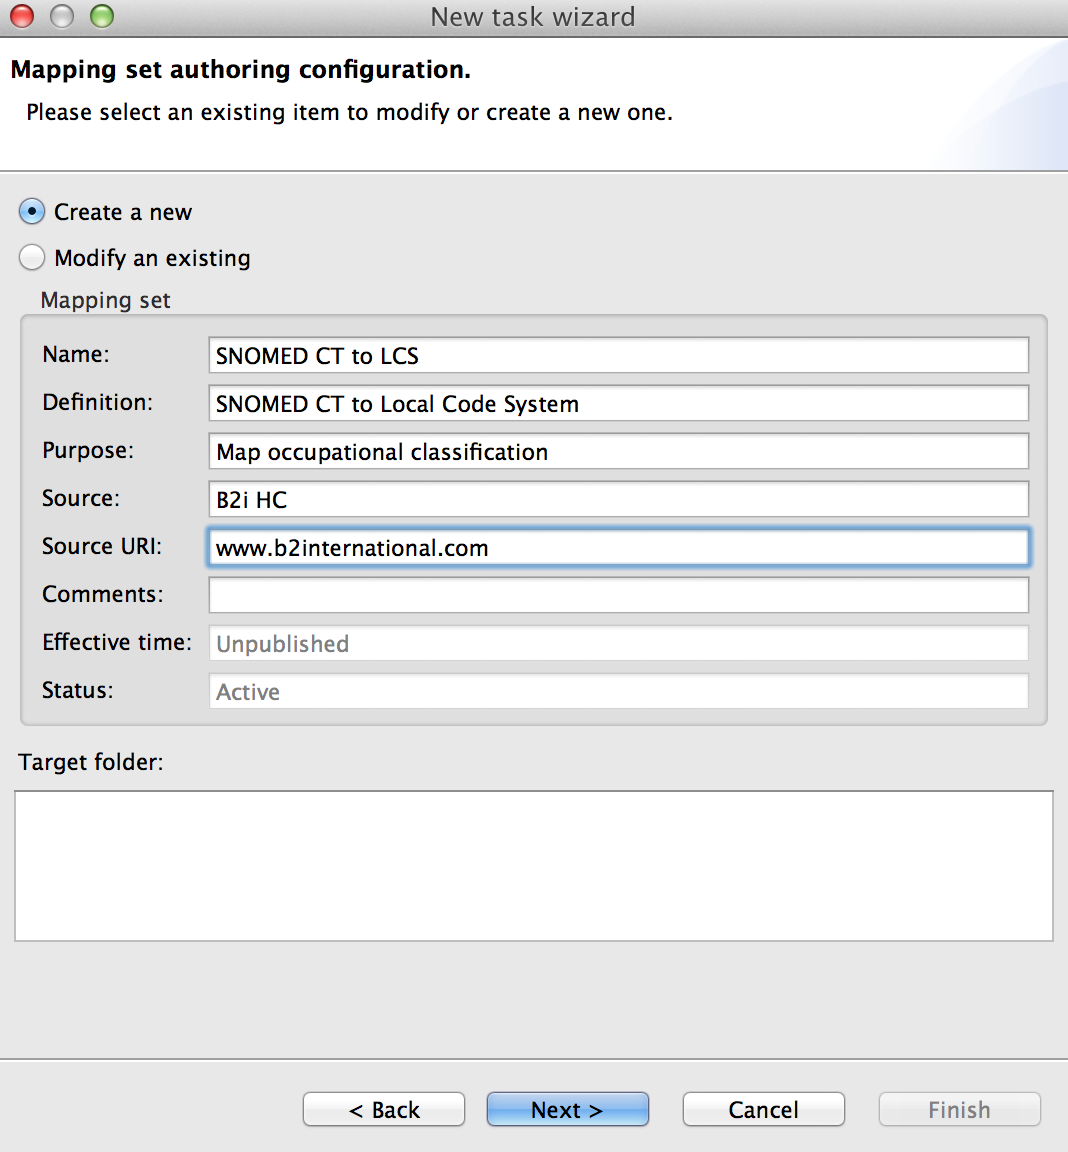
Select Single author with single reviewer as a scenario, specify the team members that will be working on the task, and add a task summary. Click Finish to complete the task generation.

To activate your task click on the purple circle in the toolbar. A frame will appear around the circle indicating that the task is active (see screenshot). You can also activate your task by clicking on the circle in the task view.
After the activation an information dialog allows changing into the mapping set perspective. A mapping set will be automatically generated, it is only visible when working on the branch. Open the new MS from the MS set view or by clicking on the link in the toolbar. You can now start mapping.

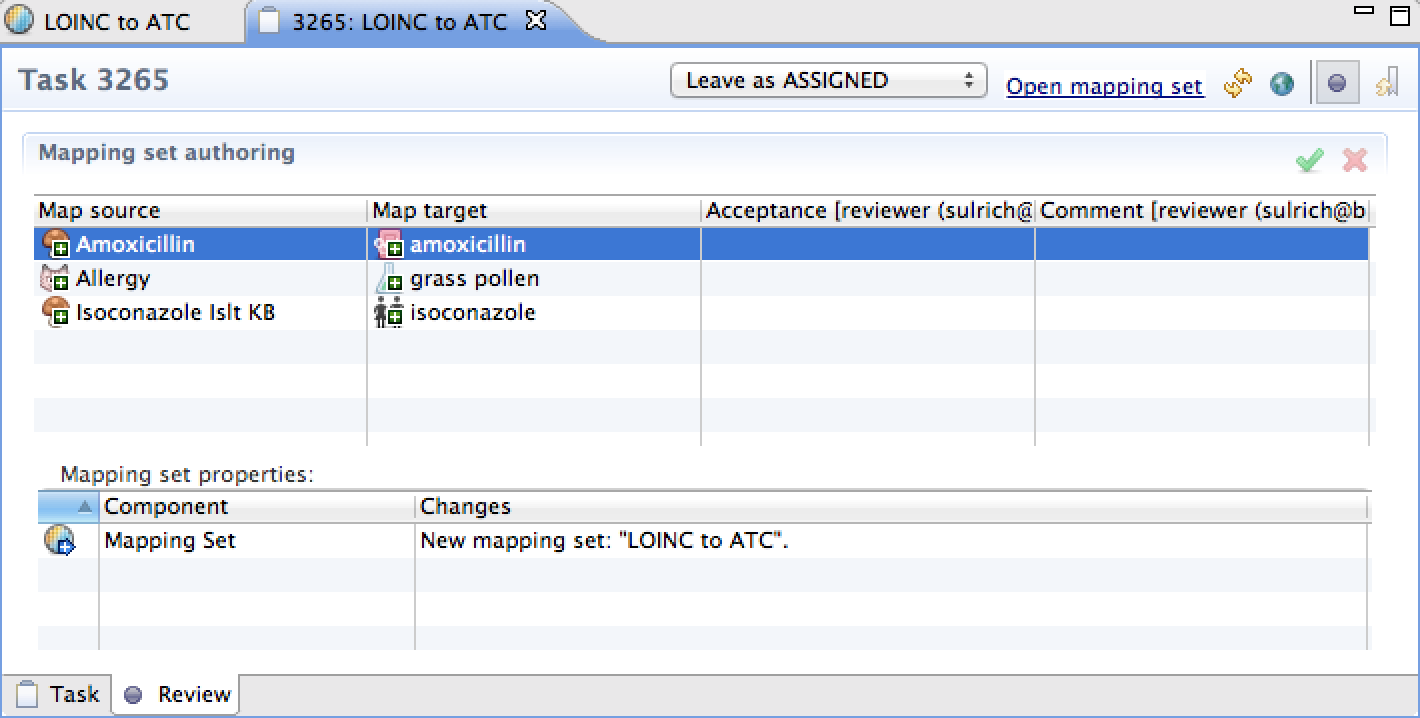
The review page displays changes made during working on a branch. The table shows the concepts that were mapped. Please note that the map has to be saved before its members are displayed on the review page. Mappings that are deleted during the authoring process will also be removed from the review page. It reflects the latest saved version of the map.
Once you've completed work on the MS, the following steps are necessary to push the workflow forward:
If your role is a reviewer you first meet the task when it is already in a FIXED state. You can scan through the changes on the review page of the editor, but to be able to accept or deny the work done you need to activate it. As a reviewer you can decide which mappings should be included in the final map type reference set.
Only mappings that were accepted will be submitted for promotion. Mappings that were denied or not reviewed will be excluded. It's also possible to write a comment, e.g. reason for denial, suggestion for different mapping.

Once the review is completed, make sure you save your review, set the status to Mark as VERIFIED, and save the status change. The status will change from RESOLVED to VERIFIED FIXED.
If you are not happy with the work performed, the task can be reopened and handed back to the author. Alternatively, a different author can be assigned by entering the user name of a new team member in the Assignees section. The status will change from RESOLVED to REOPENED.
After a task reached the VERIFIED state it is ready to be promoted and committed into the main repository. Click the Promote icon
![]() in the toolbar. If it is disabled the task might not have been reviewed and verified, or there were changes on the main repository that aren't reflected on the task and you need to synchronize first. You can only promote a task if your role is a reviewer or adjudicator.
in the toolbar. If it is disabled the task might not have been reviewed and verified, or there were changes on the main repository that aren't reflected on the task and you need to synchronize first. You can only promote a task if your role is a reviewer or adjudicator.
After a successful promotion the status of the task changes from VERIFIED to CLOSED, the task is automatically inactivated. From this point it can only be viewed but not reopened anymore. In the task view, green font indicates that a task was completed today; grey font indicates that it was completed in the past (but not today).
| Previous | Top | |
| Workflow |