Concept editor
| Close encounters with the concept - Introducing the editor | ||
|---|---|---|
| Previous | Next | |
| Surfing the sea of SNOMED CT - Browsing and searching with Snow Owl | Custom-built subsets: Reference sets in Snow Owl | |
The concept editor serves two basic functions:
In this introduction, we will focus primarily on the first part.
As discussed in the previous sections there are different ways to open an editor:
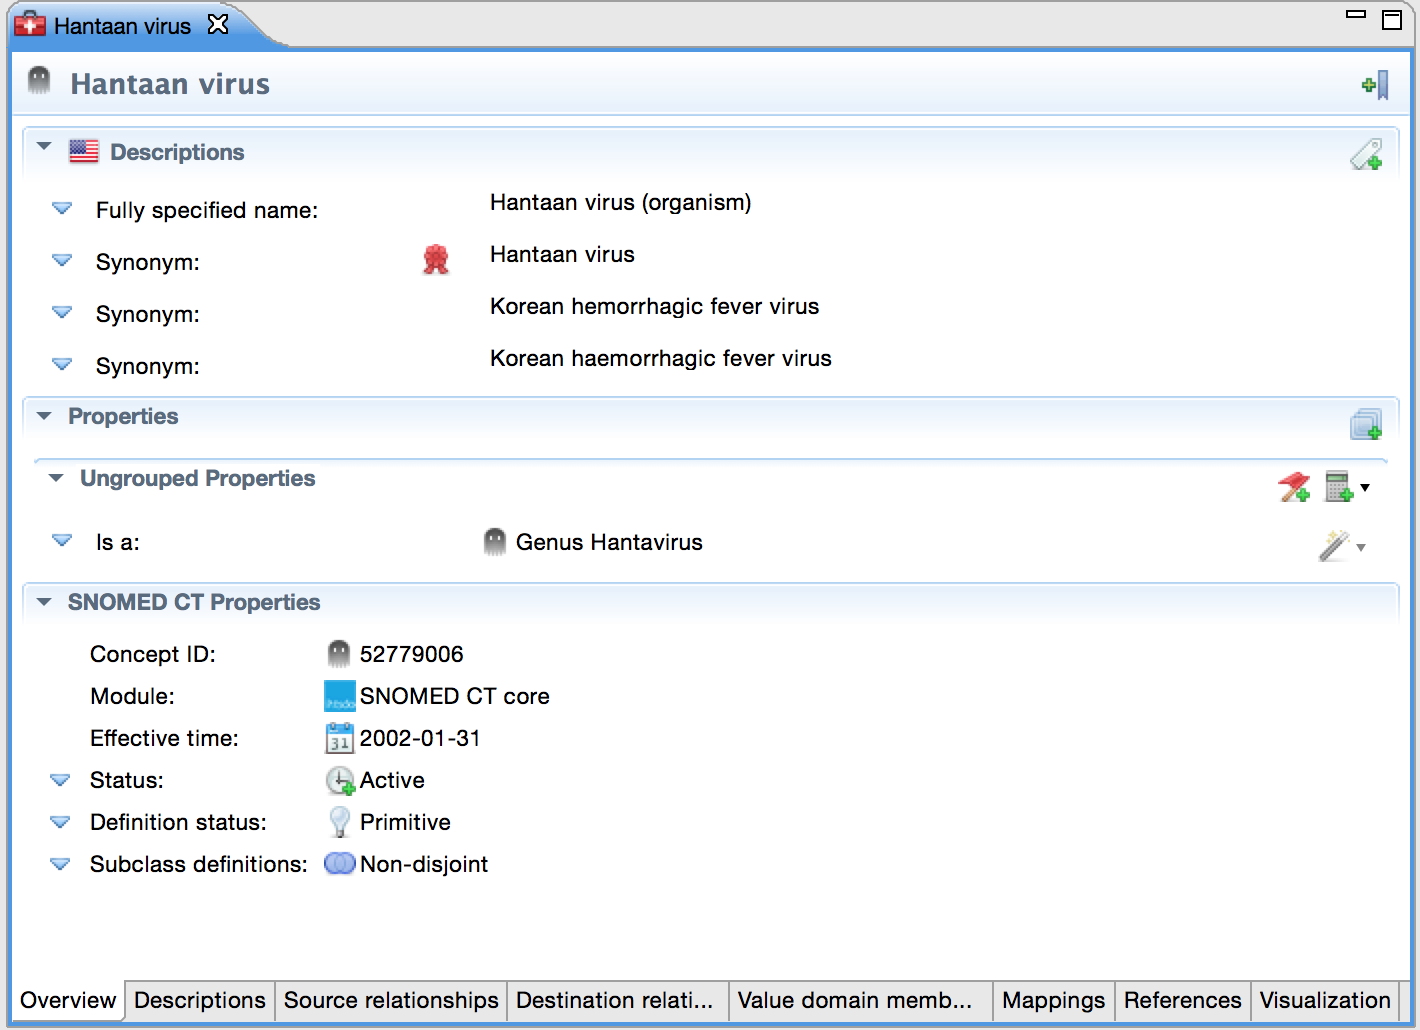
The title of the editor shows the preferred term of a concept (here: Hantaan virus).
If multiple concepts are open at the same time as in the example below, they appear as tabs, making it easy to switch from one to another. You can move tabs around to change the order by clicking and dragging. If the space is too small to display all tabs, the >> symbol will indicate the number of hidden editor tabs (here: >>1 symbolizing one hidden editor tab). Clicking the symbol will display a drop-down box with the other open concepts editors to pick from.
To close an editor, just click the x symbol. Alternatively, you can right-click the tab to perform the following actions: Close, Close Others or Close All.
The concept editor displays information on a series of pages (e.g. overview, source relationships, mappings) that can be selected by clicking the tabs in the bottom. In this Getting Started guide, we'll focus only on the first page, which is called the overview page.
You can
bookmark a concept by clicking the toggle button
![]() in the upper right corner of the editor. If you click the the button a second time the bookmark will be removed from the concept. When bookmarking a concept a small blue bookmark symbol will be added to the top-level concept icon
in the upper right corner of the editor. If you click the the button a second time the bookmark will be removed from the concept. When bookmarking a concept a small blue bookmark symbol will be added to the top-level concept icon
![]() making it easy to recognize bookmarked concepts in the SNOMED CT concepts view.
making it easy to recognize bookmarked concepts in the SNOMED CT concepts view.
The overview page shows information on the concept's descriptions, relationships, and metadata. It is comprised of three sections:
The sections can be expanded or collapsed using the small triangle next to the section heading.
Clicking on the blue triangles will display a list of actions that you can perform (e.g. create a copy of a description, delete a concept).

Snow Owl doesn't require you to add particular types of relationships or descriptions; you just need to enter the appropriate values. That's because all of the descriptions and properties that are appropriate to the selected concept appear automatically. These values come from a concept model, which can be customized for your particular organization.
![]() Warning: The international version of Snow Owl ships with the IHTSDO's
SNOMED CT Concept Model. However, this concept model is incomplete which means that many valid SNOMED CT concepts are reported as violating their own model. If you would like to contribute to improving the concept model, please join the
IHTSDO Machine Readable Concept Model project group.
Warning: The international version of Snow Owl ships with the IHTSDO's
SNOMED CT Concept Model. However, this concept model is incomplete which means that many valid SNOMED CT concepts are reported as violating their own model. If you would like to contribute to improving the concept model, please join the
IHTSDO Machine Readable Concept Model project group.
Because the concept model is incomplete, we indicate violations as warnings rather than errors. Once the IHTSDO concept model has been finalized, we will change this validation from a warning to an error. That's also why we allow entering descriptions and properties that are not permitted ("unsanctioned") by the current concept model.
The icons on the right side of the sections allow you make unsanctioned changes (i.e. changes that don't conform to the concept model) and will be discussed in the following sections. They perform the following actions:
![]() Tip: If you hover the cursor over one of the descriptions a
tooltip with additional details will be displayed. This feature is also in the properties section.
Tip: If you hover the cursor over one of the descriptions a
tooltip with additional details will be displayed. This feature is also in the properties section.

This section displays the descriptions associated with the concept. In the left column you can see the description type (here: Fully Specified Name, Full Name, Synonym, and Short Name), in the right column the description term (e.g. Mixed fruit flavor). Longer descriptions will be presented on multiple lines.
A rosette icon
![]() indicates the
preferred term. The flag
indicates the
preferred term. The flag
![]() on the section heading indicates the currently active language dialect (here: Singaporean English).
on the section heading indicates the currently active language dialect (here: Singaporean English).
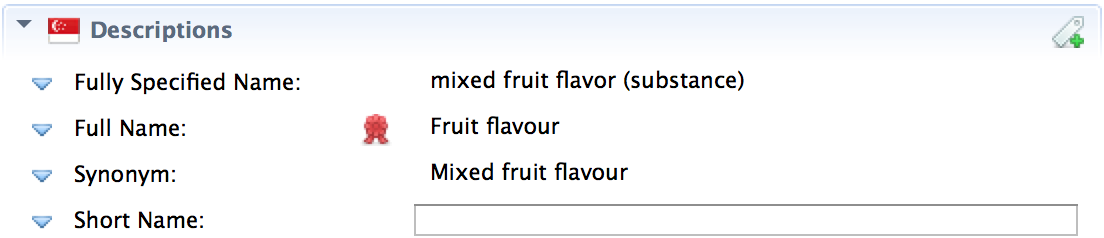
Clicking on the blue triangle next to a description will display a list of actions that can be performed on the description:
![]() Did you know? The descriptions section will automatically create entry fields for all description types in the concept model. For example, if the concept model requires two "Search keyword" description types to be present based on the concept's parentage or reference set membership, then two "Search keyword" fields would appear in this section. A description tag icon
Did you know? The descriptions section will automatically create entry fields for all description types in the concept model. For example, if the concept model requires two "Search keyword" description types to be present based on the concept's parentage or reference set membership, then two "Search keyword" fields would appear in this section. A description tag icon
![]() allows adding additional unsanctioned (i.e. not defined in the concept model) descriptions to the concept.
allows adding additional unsanctioned (i.e. not defined in the concept model) descriptions to the concept.
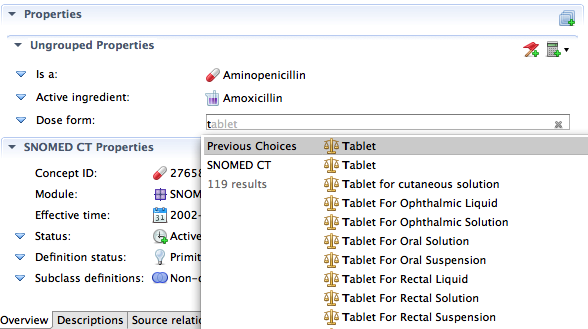
The properties section displays the concept's relationships and datatype properties. The property type (here: Is a, Active ingredient, and Dose form) is displayed on the left, the property value (e.g. Amoxicillin) on the right.
Hey! There's our old friend, the quick search, hanging out in the properties section. As before, typing the first few characters of your term is usually enough to find what you're looking for. Only valid values will be displayed here. Once you've used this field a few times, it will be much easier as your previous choices (and even bookmarks) will appear when you enter the field.
Clicking on the blue triangle next to a property will display a list of actions that can be performed on the property:
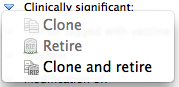
![]() Why are the options
Clone and
Retire disabled in the example above? That's because the concept model influences the actions that are available for a particular property. In the example, the concept model specifies that one and only one "Clinically significant" property may appear. Therefore cloning the property is not allowed (as there would then be two properties) neither is retiring the property (as there would then be zero properties). This way, Snow Owl prevents you from making mistakes.
Why are the options
Clone and
Retire disabled in the example above? That's because the concept model influences the actions that are available for a particular property. In the example, the concept model specifies that one and only one "Clinically significant" property may appear. Therefore cloning the property is not allowed (as there would then be two properties) neither is retiring the property (as there would then be zero properties). This way, Snow Owl prevents you from making mistakes.
A big time saver is that the properties section will automatically create entry fields for all relationships and datatype properties specified in the concept model. That means that you can focus on entering the values rather than trying to determine what properties are appropriate for the particular type of concept you're working on.
For example, if the concept model specifies that a Dose form relationship must be present, an entry field for dose form will appear in this section (see screenshot above). The valid values for the property are also specified in the concept model; in this example we see members of a dose form reference set displayed. The concept model can impose several other constraints (e.g. the relationship group that the properties appear in)--for more details please refer to the concept model help in the Snow Owl User Guide .
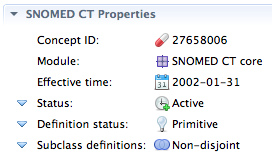
This section displays metadata about the concept--the concept's SNOMED CT properties. The fields in this section are always the same: Concept ID, Module, Effective time, Status, Definition status, and Subclass definition.
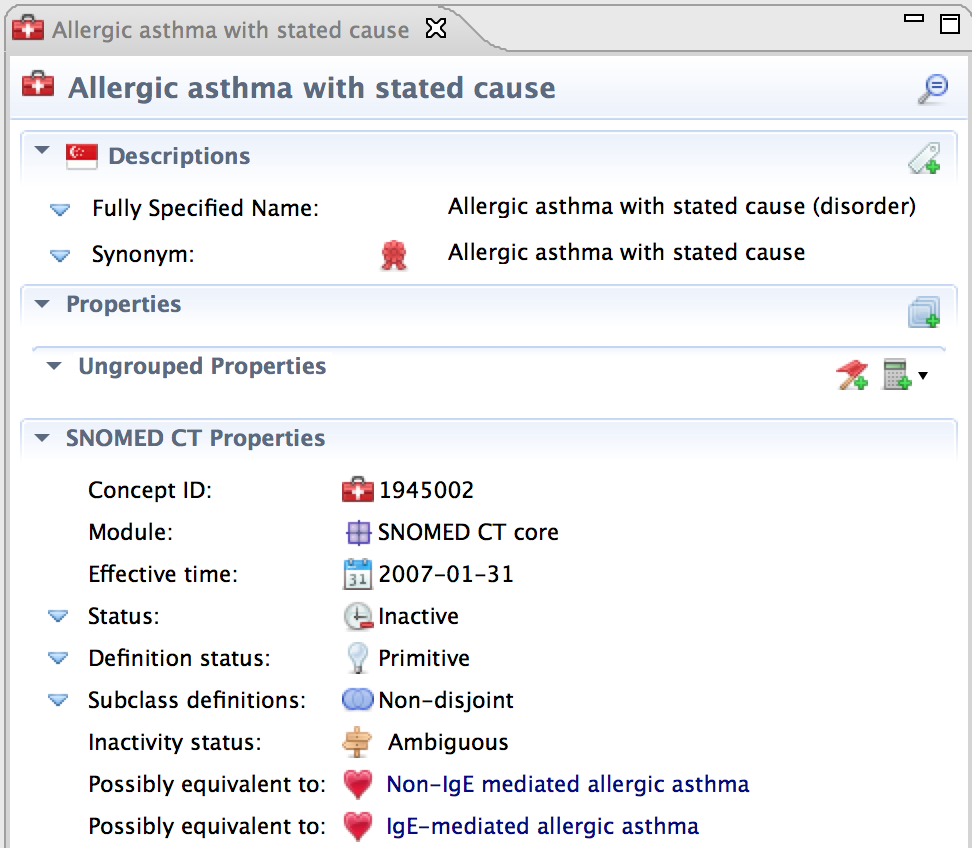
This section also displays additional information about inactive concepts when available. For example, concepts inactivated due to ambiguity often list alternate choices that may be equivalent, as in the example for Allergic asthma with stated cause shown below. The alternate choices are hyperlinks, so you can simply click on them to open the alternate concept in a new editor.
Clicking the blue triangle next to a SNOMED CT property will display a list of actions that can be performed on the property. The available actions vary depending on the property.
The status property's actions allow inactivating or deleting a concept (depending on its publication status). Available actions:
The
definition status property action allows setting a concept to
![]() primitive or
primitive or
![]() defined.
defined.
The subclass definitions property is an advanced description logic feature that declares that all subclasses of the current concept are mutually disjoint. Unless you are working with the IHTSDO's proposed SNOMED CT Pharmacy Model or doing research on extending the expressivity currently used by SNOMED CT, you do not need to modify this setting.
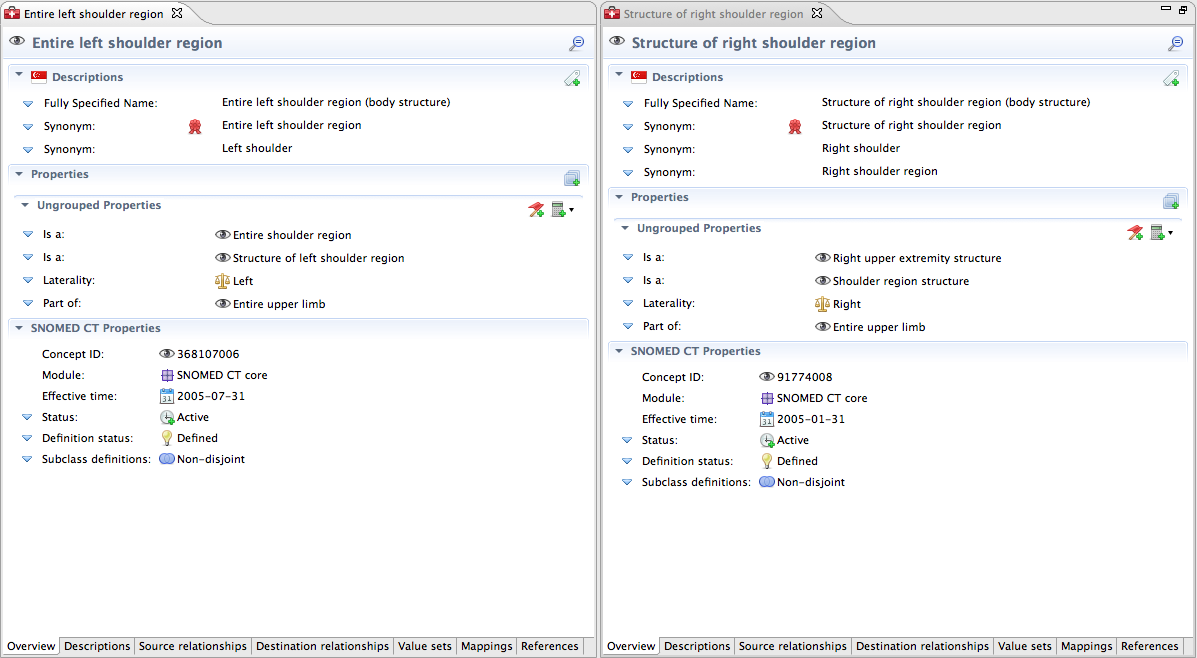
If you want to compare two concepts, it might be handy to show two editors side by side. Here's how it goes:
1. Open two editors, they will appear as tabs next to each other as in the screenshot below.

2. Drag one of the tabs to right side of the editor until a small black arrow appears. The arrow will indicate where the new editor will be docked. The editors will be now displayed side by side within the editor area.
3. If you want to see them as a full screen, double-click the title tab in either of the editors.
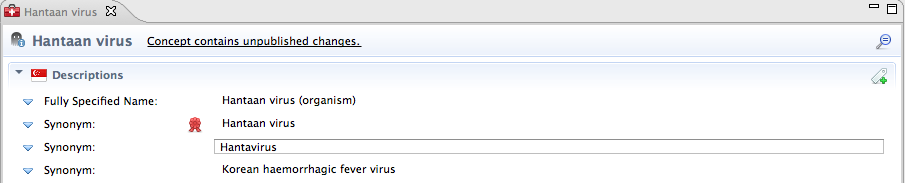
As an example for editing a concept, we will change the description of a concept by adding a synonym.
1. Click the
add unsanctioned description icon
![]() to create text boxes in the description section. A small asterisk * next to the editor's title will indicate that you have unsaved changes. An informational message will also appear at the top of the editor box (here: Concept contains unpublished changes), and a small information symbol will be added to the top-level concept icon.
to create text boxes in the description section. A small asterisk * next to the editor's title will indicate that you have unsaved changes. An informational message will also appear at the top of the editor box (here: Concept contains unpublished changes), and a small information symbol will be added to the top-level concept icon.
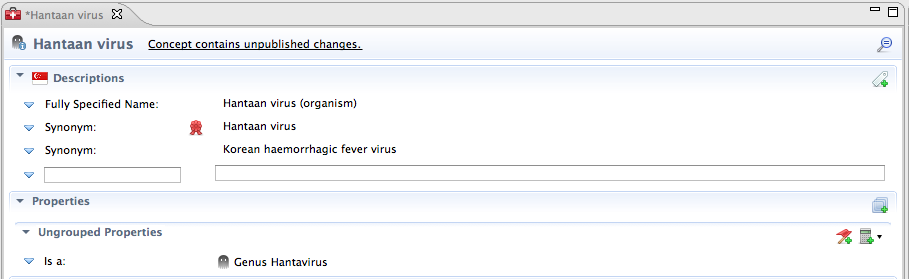
2. Type your description type (e.g. Synonym) in the text box on the left, and your new description term (e.g. Hantavirus) in the text box to the right. The autocomplete function described in the quick search section is also available.
3. Click the
save button
![]() in the main toolbar to submit your changes the repository. Before the changes are saved, a dialog box will appear in which you may
enter a comment describing your change.
in the main toolbar to submit your changes the repository. Before the changes are saved, a dialog box will appear in which you may
enter a comment describing your change.

4. Once the changes have been saved, the new description appears in the editor. The box around the description term (here: Hantavirus) indicates an unpublished change. This means that the change has been saved in the repository but not been formally published yet. Once a concept has been published, only the text appears.
![]() Tip: Error, warning, and informational messages are displayed at the top of the concept editor. You can click on one of the messages to jump to this point in the concept editor.
Tip: Error, warning, and informational messages are displayed at the top of the concept editor. You can click on one of the messages to jump to this point in the concept editor.

The preferred term of a concept is indicated by a rosette icon
![]() .
.
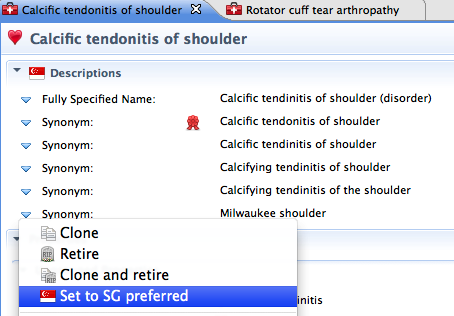
As an example, we want to change the preferred term from Calcific tendinitis of shoulder to Milwaukee shoulder.

1. Click the blue triangle in front of your new preferred term (in this case: Milwaukee shoulder) to bring up a list of actions,
2. Chose Set to ... preferred from the actions. Since we're using the Singapore extension at the moment, we choose Set to SG preferred.
3. The
preferred term icon
![]() will now be displayed in front of the new term . A small asterisk * next to the title will indicate that you have unsaved changes.
will now be displayed in front of the new term . A small asterisk * next to the title will indicate that you have unsaved changes.
4. Click the
save button
![]() in the main toolbar to submit your changes the repository. You may enter a comment describing your change in the dialog.
in the main toolbar to submit your changes the repository. You may enter a comment describing your change in the dialog.
5. The new preferred term will now appear in the title of the editor. It will also appear on the top of the list in the quick search.
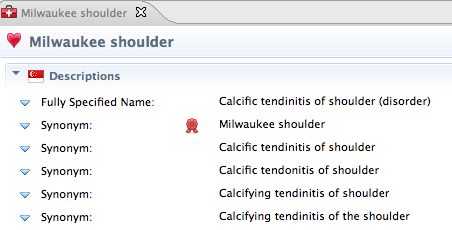
![]() Did you know? The Milwaukee shoulder is indeed named after the city in Wisconsin. In 1981 a group of clinicians from the medical college there described the degenerative shoulder condition and introduced the term. The Milwaukee shoulder made it into medical books - and into SNOMED CT. That's why you can find this little piece of Milwaukee history in Snow Owl.
Did you know? The Milwaukee shoulder is indeed named after the city in Wisconsin. In 1981 a group of clinicians from the medical college there described the degenerative shoulder condition and introduced the term. The Milwaukee shoulder made it into medical books - and into SNOMED CT. That's why you can find this little piece of Milwaukee history in Snow Owl.
| Previous | Top | Next |
| Surfing the sea of SNOMED CT - Browsing and searching with Snow Owl | Custom-built subsets: Reference sets in Snow Owl |